Birthday Cutout Sugar Cookies

These may be called “birthday sugar cookies” but I approve them to be eaten on any day all year long! Enjoy them for any celebration, special milestones, or also just because you want a tasty dessert. I love making these for fun and adding a small amount of white chocolate to add décor and to add a little extra sweetness. The cookie itself without the chocolate isn’t overly sweet (but more buttery and delicious), so this makes for the ultimate pairing! Adding in the colorful sprinkles makes for a fun burst of color and you can even add different color themes to go with parties, holidays like Christmas, Valentine Day, and more! Hope you enjoy!

Ingredients:

1 cup melted butter

2 cups white sugar

2 eggs

2 tsp vanilla ext

4 cups all-purpose flour

1/2 tsp salt

1 tsp baking soda

1 tsp baking powder

3/4 cup buttermilk

1/2 cup sprinkles

white chocolate for decorating (can use buttercream if you rather)

Instructions:

  1. Beat butter and sugar together.

  2. 2. Add eggs and vanilla extract, and mix well.

  3. In another bowl, sift flour, salt, baking soda and baking powder together, and add little by little to butter mixture, alternating with buttermilk.

  4. Now that your dough is made you will wrap in plastic wrap and refrigerate for at least 6 hours. I like to let mine stay overnight and up to 24 hours. This makes the cutouts come out better on edges.

  5. After dough has chilled and you are ready to roll out. Heat oven to 375 degrees.

  6. Be sure to flour surface area, rolling pin and dough to make sure no sticking happens. I am using 360 cookie cutters here! So many amazing designs and shapes!! Shop entire collections -here- (use code AMANDAWARREN20 for 20% off entire site)

  7. Bake for 8-10 minutes on stainless steel pan. After baking place onto cooling rack and decorate once cooled. After decorated ENJOY!!

Fruit & Goat Cheese Bruschetta

In the middle of a hot Summer and the hottest days of all call for the most delicious treats to make it through! I’m a huge fan of bruschetta, so making this twist on it as a fruity version just seemed so delicious and fit for Summer. You can totally change this up in the fruit department to whatever fruit sounds yummy to you along with whatever is best in season! I did strawberries, cherries and raspberries this time, and it was oh so delicious!

Now.. how do you BBQ these little slices of baguette’s? I just found out the way to not burn my 360 cookware griddle on the grill is to put a coat of dish soap on the bottom and MY GOODNESS its genius! The Pan Cleaned so easy! Cannot wait to work on even more recipes for the grill with my favorite 360 pans!

Ingredients:

8 oz cut strawberries

6 oz cut cherries

6 oz raspberries

8 oz whipped cream cheese

8 oz goat cheese

1 lime

1 baguette

honey

salt & pepper

Directions:

  1. Wash & cut all fruits and mix into bowl.

  2. Zest 1 lime making 1 tsp of lime zest and add into small bowl with 1 tbsp of sugar. Pour over fruit mix & juice of 1 lime and mix together.

  3. Mix whipped cream cheese & goat cheese. sprinkle over with sea salt & pepper to taste. Drizzle with honey and set aside until bread is ready.

  4. Slice baguette and spray with olive oil spray.

  5. Take your 360 griddle and apply dish soap on bottom to prevent from burning pan.

  6. Now on your BBQ take the griddle and place bread on top until lightly toasted (or to liking). Flip and do the same to other side.

  7. You can serve with everything separate and allow everyone to make their own. Or prep ahead of time. Baguette, cheese mixture, fruit. You can also top with more honey & more lime zest if desired.

Delicious and Easy Oven Baked Drumsticks Recipe

Oven Baked Drumsticks are a delicious and easy meal to make for a weeknight dinner. Whether you're looking for a quick and easy meal or a tasty and satisfying dish, these oven-baked drumsticks are sure to hit the spot. They're juicy and flavorful, without being too heavy, and they can be cooked in a fraction of the time it takes to prepare a more complicated meal. Plus, you can customize them to your tastes with the addition of spices and sauces. Read on to learn how to make these tasty and simple oven-baked chicken drumsticks recipe!

This is such a simple and delicious recipe that I make very often. It’s great for Summer dinners accompanied with side dishes like; fresh fruit, cauliflower, veggies and broccoli rice or in the Winter with cornbread and baked beans. It’s a fan favorite and the perfect dish for a crowd as well as something you can whip up quickly when you aren’t sure what to make.

Ingredients

6 Drumsticks

1/2 teaspoon salt

1/2 teaspoon black pepper

2 teaspoon garlic powder

1 teaspoon onion powder

1/2 teaspoon smoked paprika

olive oil spray

1/4 cup coconut amino

2 tablespoons. honey

Instructions

  1. Preheat oven to 425 degrees

  2. Spray olive oil on drumsticks and coat.

  3. Put all additional ingredients in a bowl with drumsticks and mix to coat over all drumsticks.

  4. Place bowl in the fridge and marinate for at least 1-2 but can go longer too! Halfway through marinating toss to coat drumsticks again.

  5. Once ready bake for 45 min on 360 cookware jelly roll pan or any pan you have to lay chicken drumsticks on a single layer. (I will link below) I like to place foil or parchment paper under for easy cleanup. Halfway through cooking flip the drumsticks over.

  6. Remove from oven, serve with your favorite side dishes and enjoy!

  7. For storage place in an airtight container for up to 5 days.

You can shop all the pans I used to make this dish at 360cookware and use code AMANDA20 for a total of 20% off your entire order!!

2 qt pot for rice tap -here-

Bake & Roast Pan for Chicken tap -here-

Other Chicken Dinner Recipes you will Love:

Salsa Verde Chicken Enchiladas

Slow Cooker Orange Chicken

Whole 30 Chicken Piccata

Taste the Deliciousness of Pistachio Cake: A Treat for Any Occasion

Every June for quite a few years now I have been making this Pistachio Birthday Cake for My husband Scotty. My idea for this cake all started with his love for pistachio ice cream. It is his go-to ice cream when out at an ice cream shop. So, being that he seemingly never could think of a favorite cake for himself, I thought one year I’d go ahead and make a Pistachio Cake along with pistachio ice cream, and it's been our tradition ever since! Let me know in the comments below if I should share the ice cream recipe too! I hope you enjoy this just as much as the birthday boy himself!

Pistachio cake is a delicious dessert that is perfect for special occasions like birthdays or holidays. It is made from scratch with just a few simple ingredients, making it easy to make without too many complicated steps. The result is a moist and flavorful cake with a crunchy nutty topping that everyone will love! Plus, it’s a great way to use up leftover pistachios. The base is a simple cake batter with pistachios mixed in. For the topping, you have a combination of butter, mascarpone, powdered sugar, and sprinkled nuts on top to create a crunchy texture.

The final product is a moist and flavorful cake with a crunchy nutty topping. It’s perfect for special occasions and makes a great gift for family and friends. Everyone will love the sweet and nutty flavor of this cake. So if you’re looking for a delicious dessert that is easy to make and sure to please, you must make this pistachio cake. With just a few simple ingredients and no complicated steps, you can make a sweet treat that everyone will love!

How to Enhance the Pistachio Flavor Into Cake

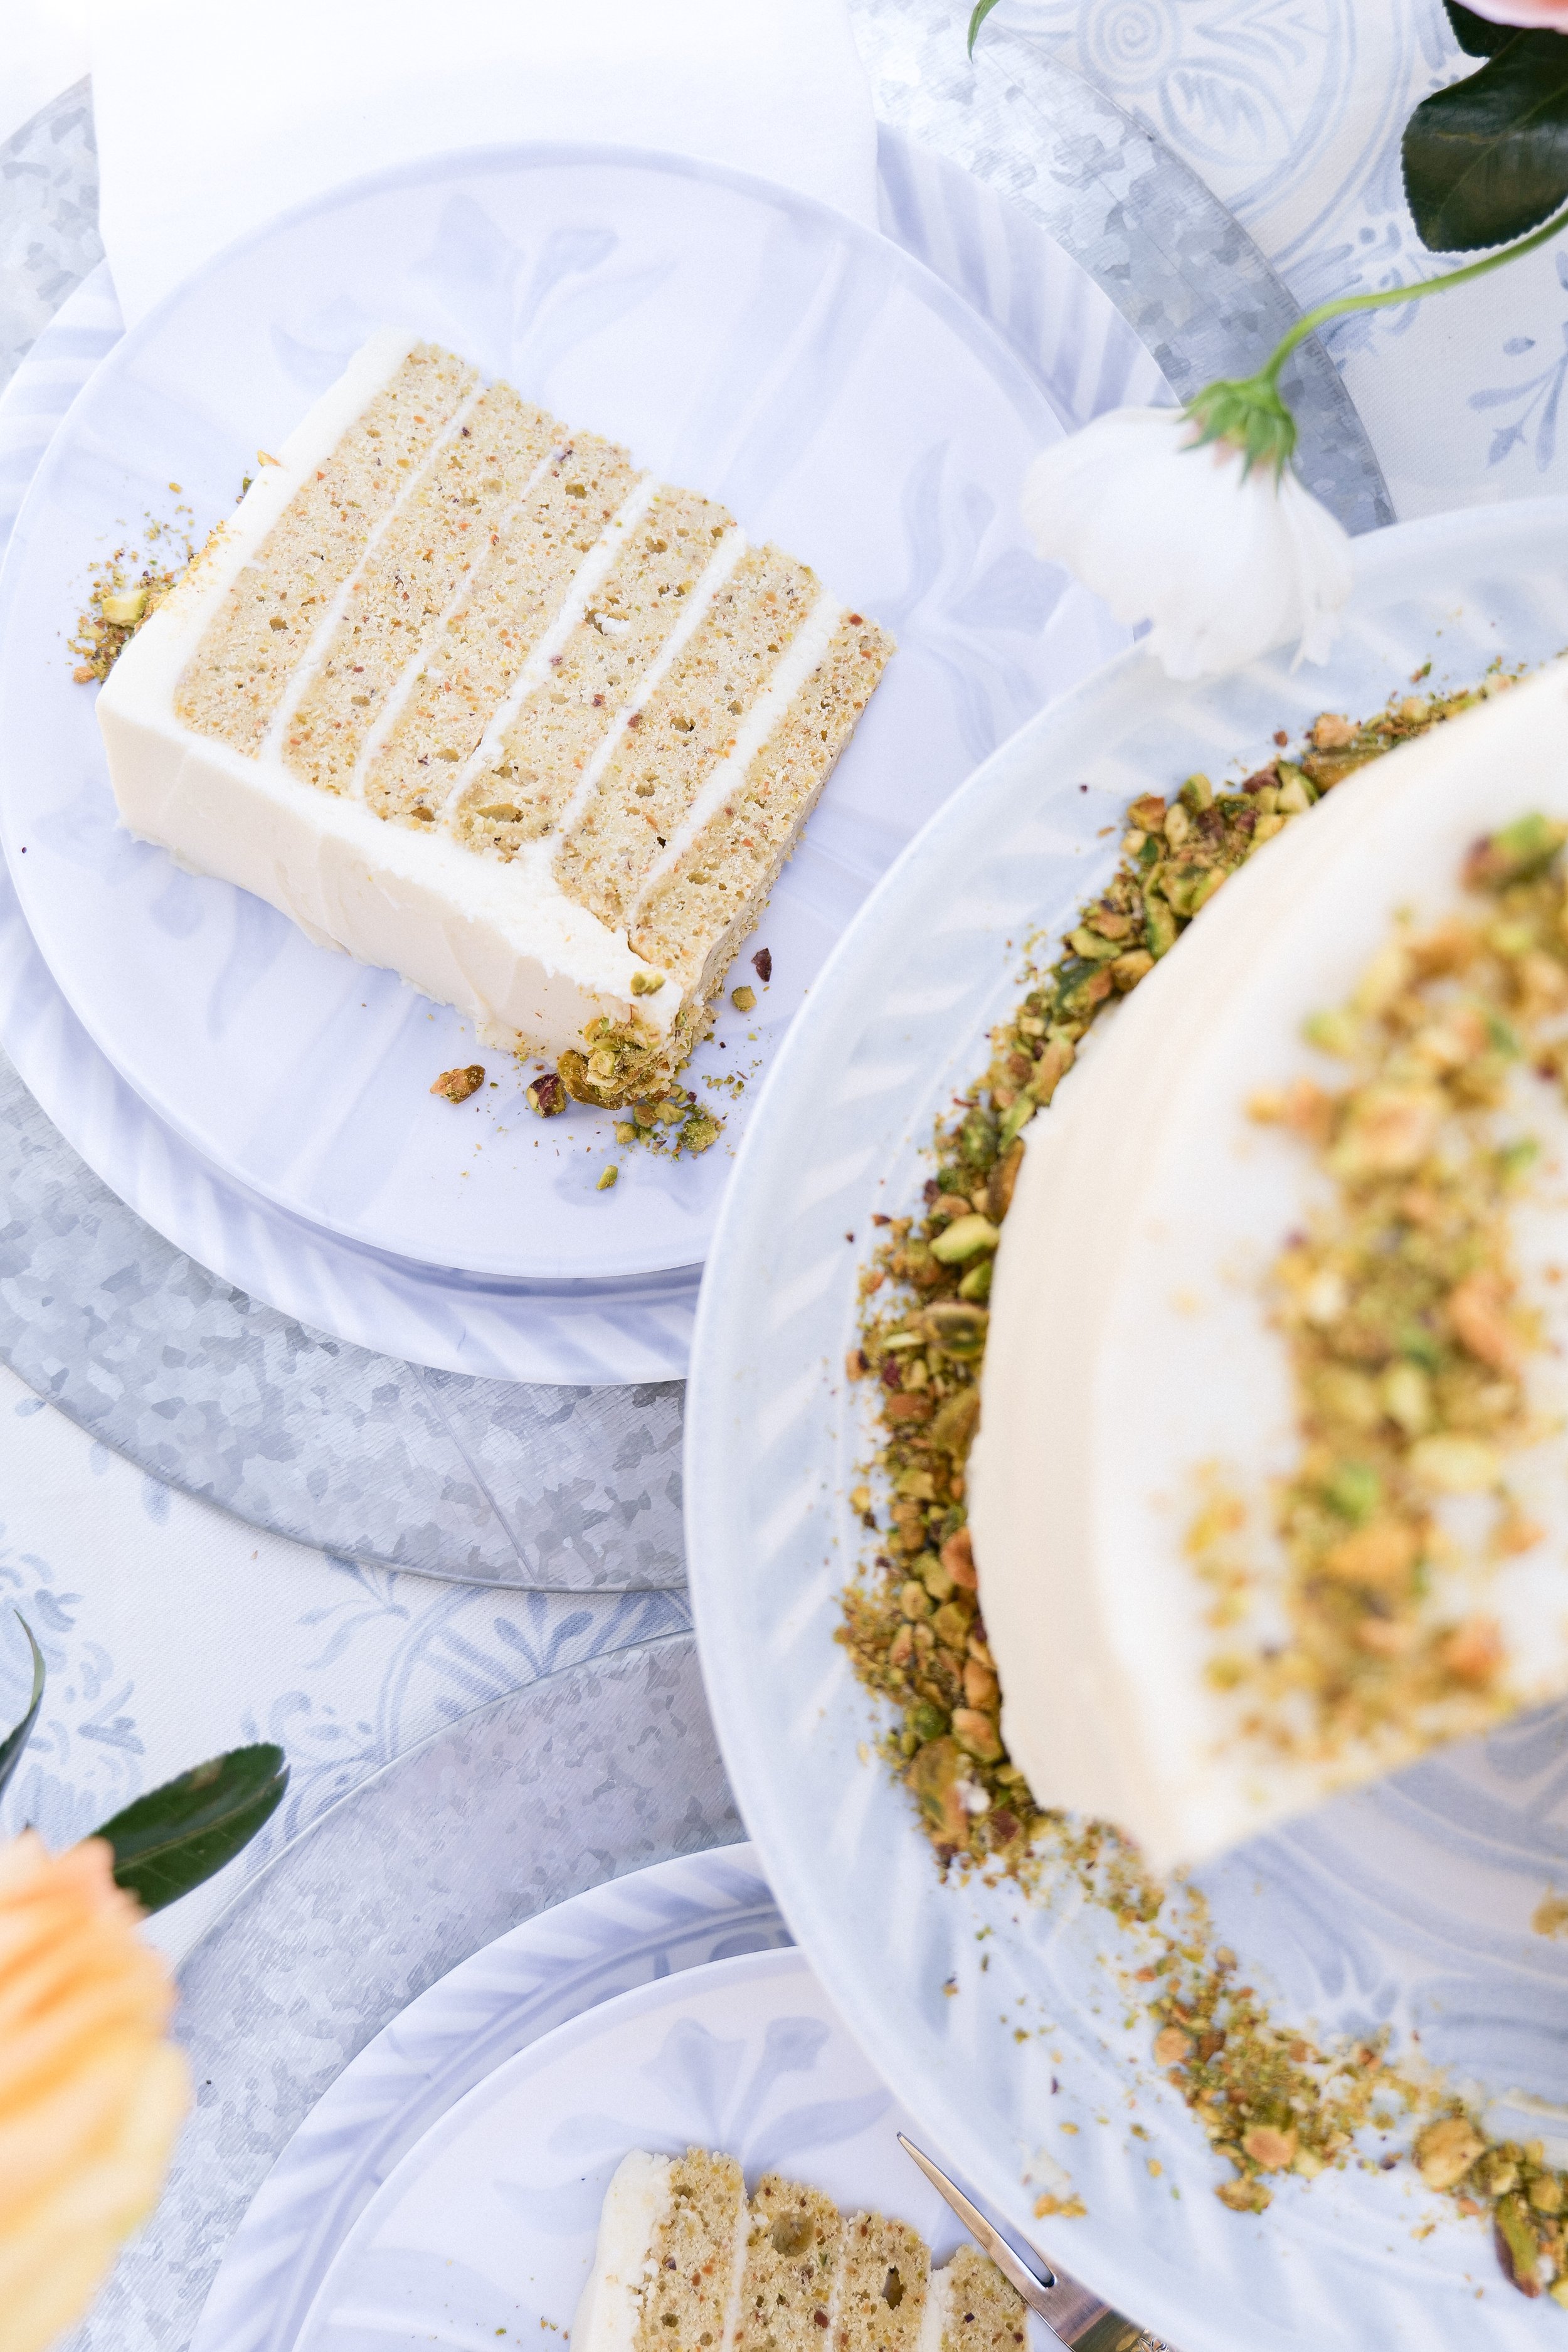
Pistachio cake is a delicious dessert that is perfect for any special occasion. The nutty flavor of pistachios pairs perfectly with moist cake and creamy frosting. I incorporate some lightly-crushed pistachios into the cake batter as well as further enhance the flavor of the cake by adding a few teaspoons of almond extract. To get the most intense pistachio flavor, you can use real pistachio paste or extract in your cake batter. For a toasty twist on the flavor, toast the nuts before adding them to the cake batter as well.

Key Ingredients

This cake is made with all-purpose flour, eggs, butter, sugar, baking powder, salt, vanilla extract, milk, pistachios, and cream cheese. The all-purpose flour provides the cake with a light, airy texture and structure. The eggs act as a binding agent and help keep the cake moist. Butter adds flavor and richness to the cake while the sugar helps to sweeten it and create a tender crumb. Baking powder helps the cake to rise and gives it a nice texture, while salt enhances the flavor of the cake. The addition of vanilla extract adds a nice flavor to the cake, while the milk helps to keep it moist. With these ingredients, you're sure to have a delicious Pistachio Cake that will be a hit with everyone!

Decorating Inspiration

Pistachio Cake is a delicious dessert that is perfect for any occasion. Adding crushed nuts and fresh berries to the top of the cake is an easy way to add a colorful layer of flavor. For an extra special touch, consider drizzling a rich chocolate sauce over the top of the cake. This simple step adds a decadent finish that will have your guests coming back for seconds.

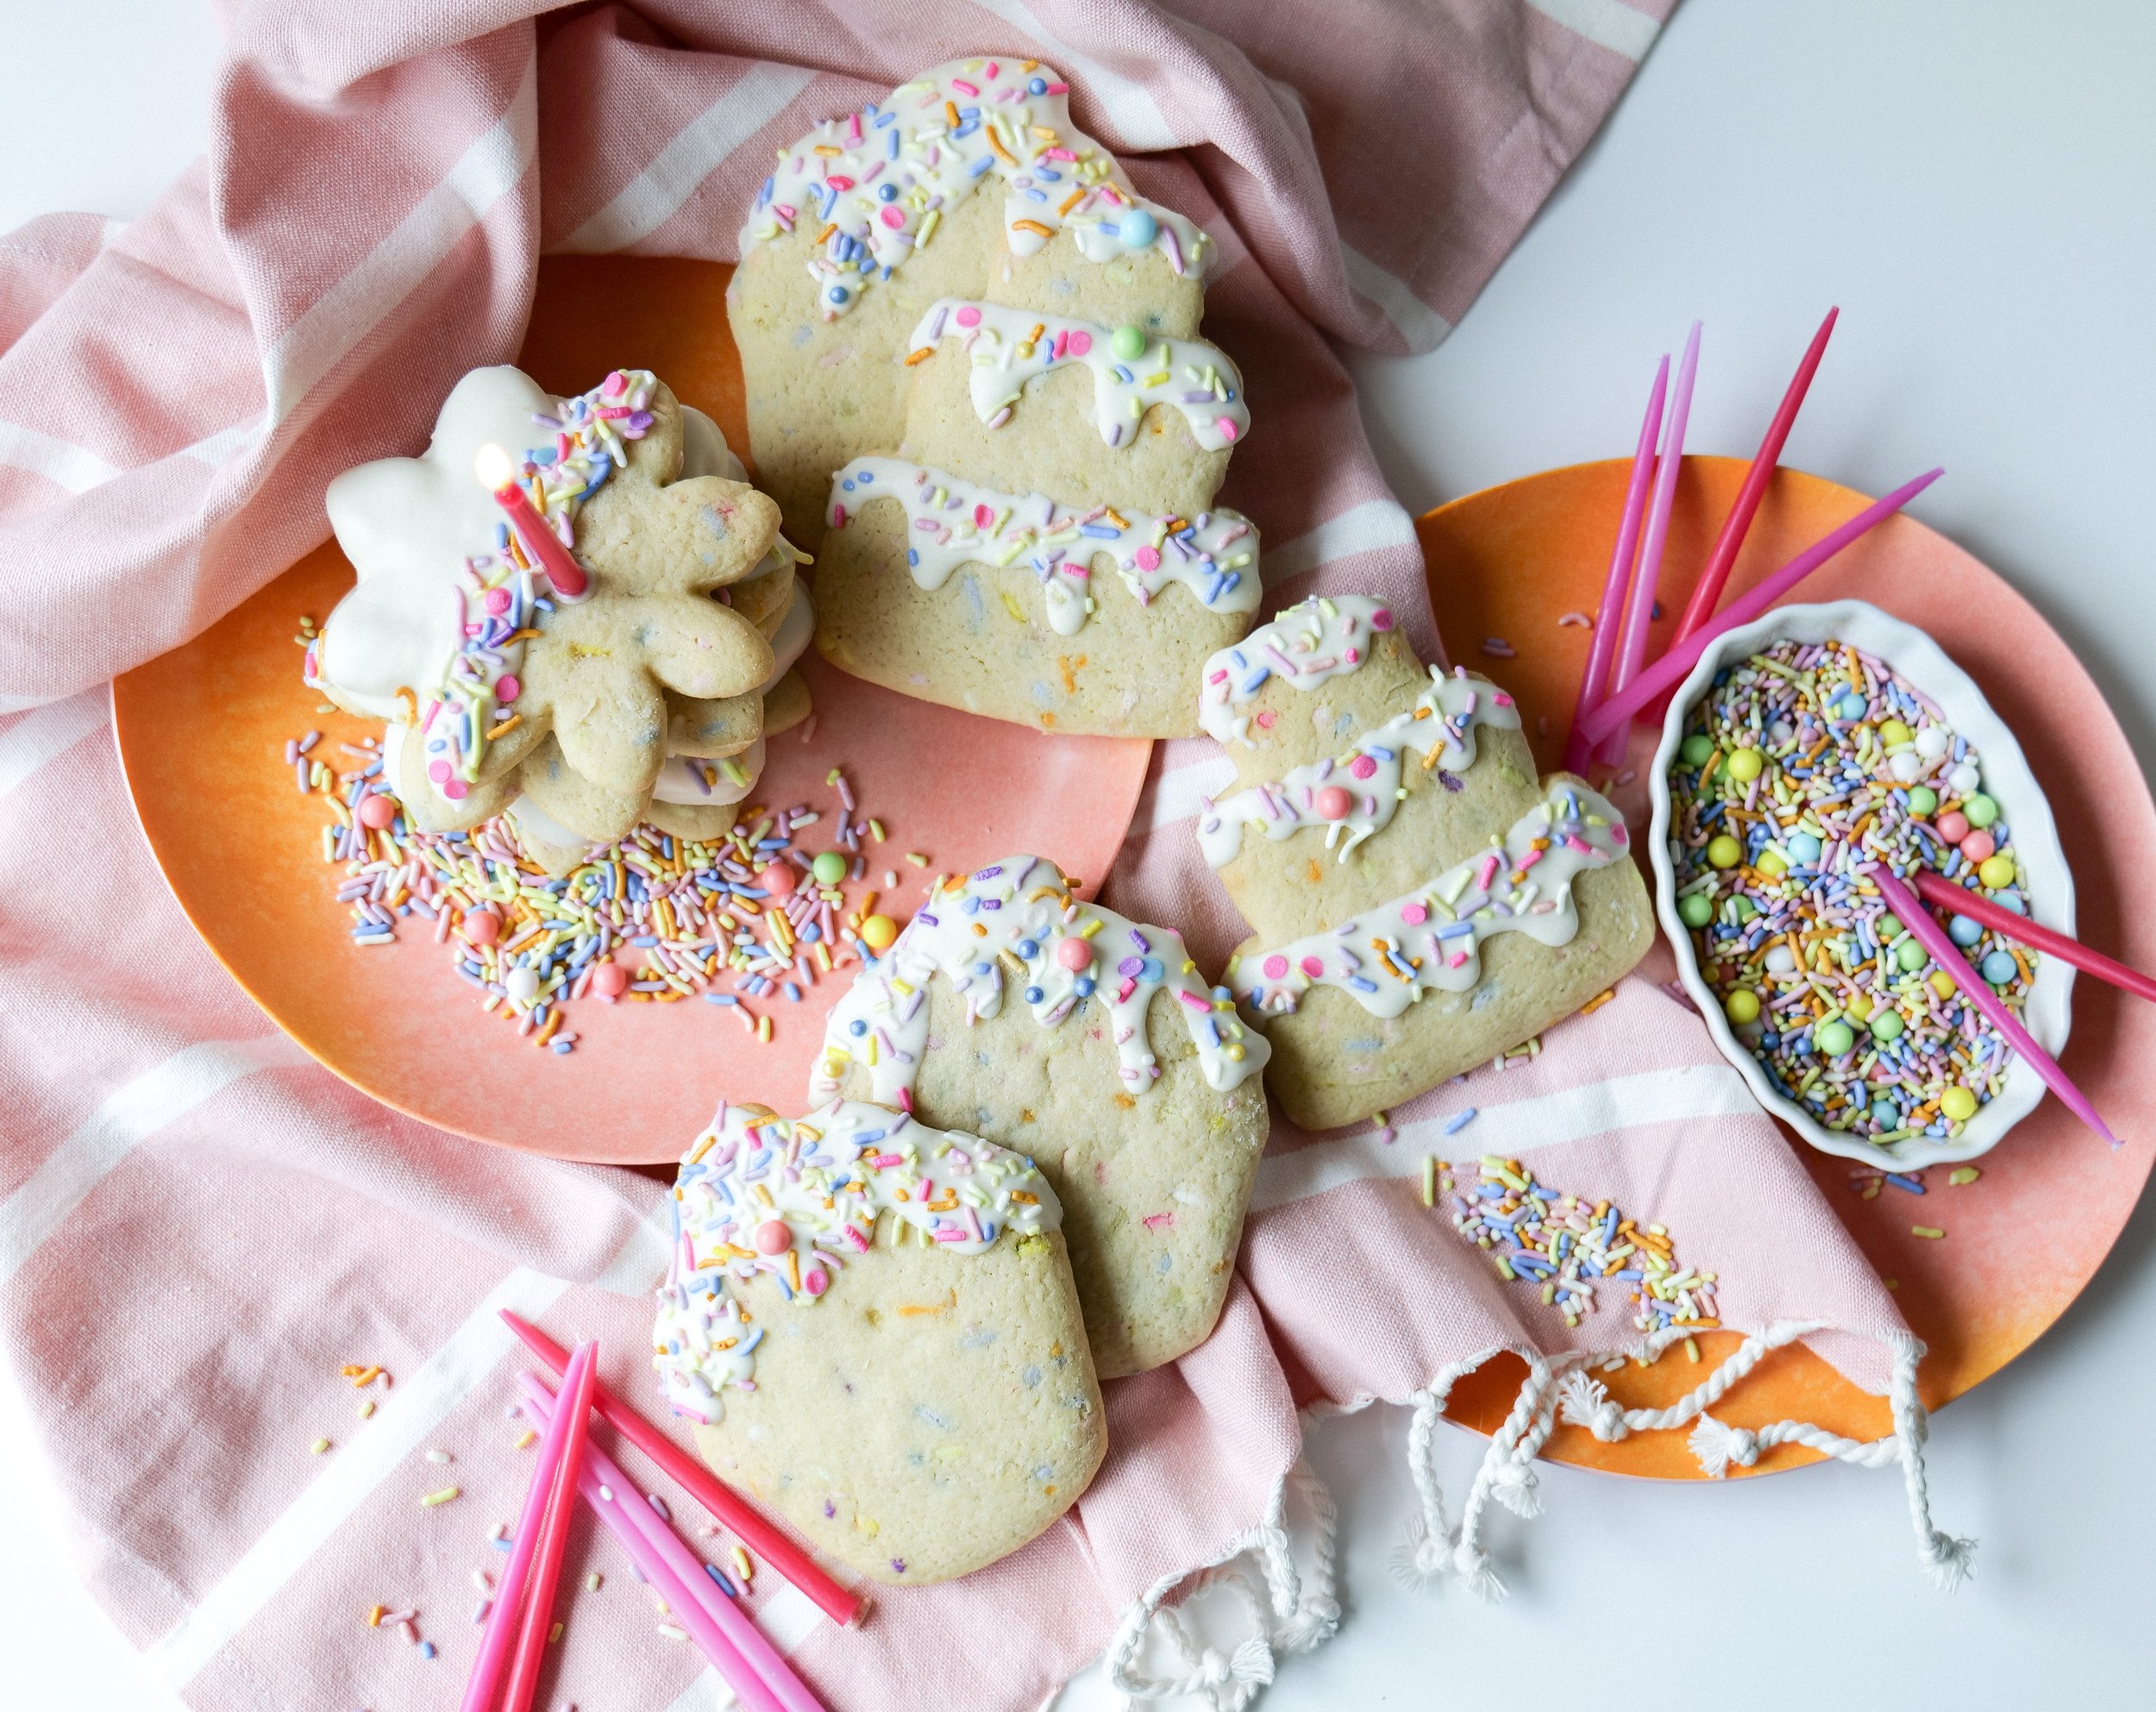
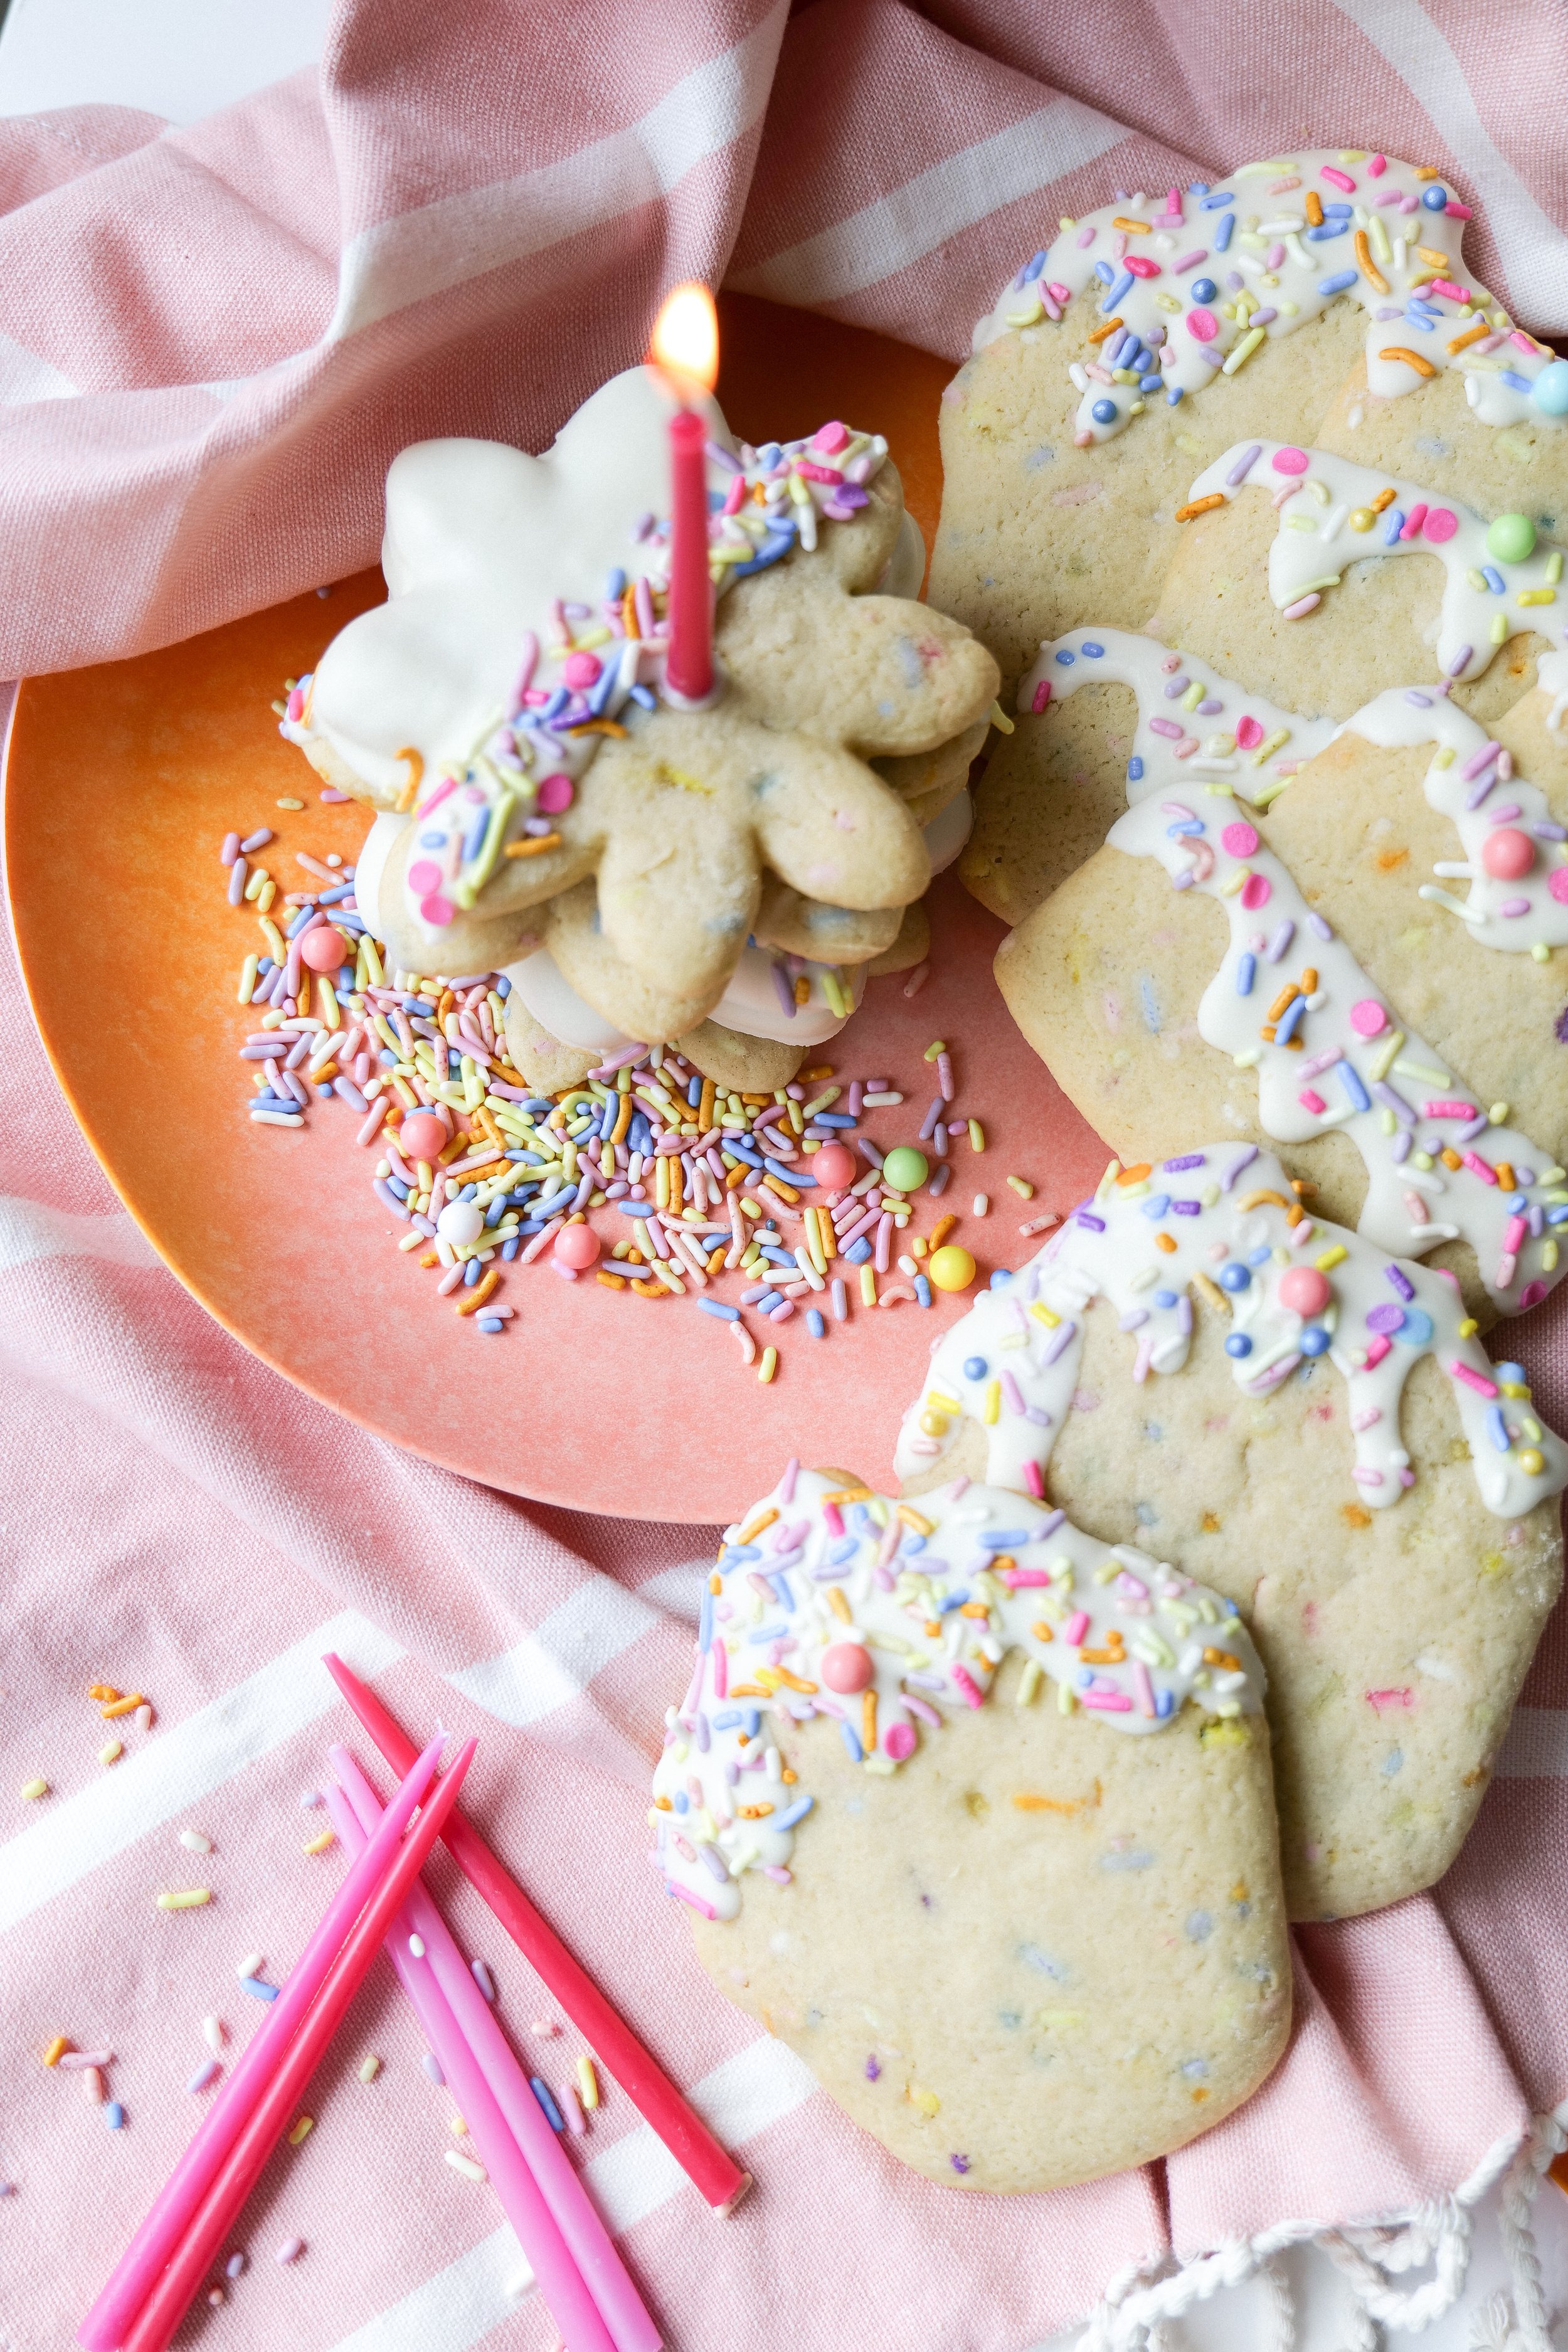
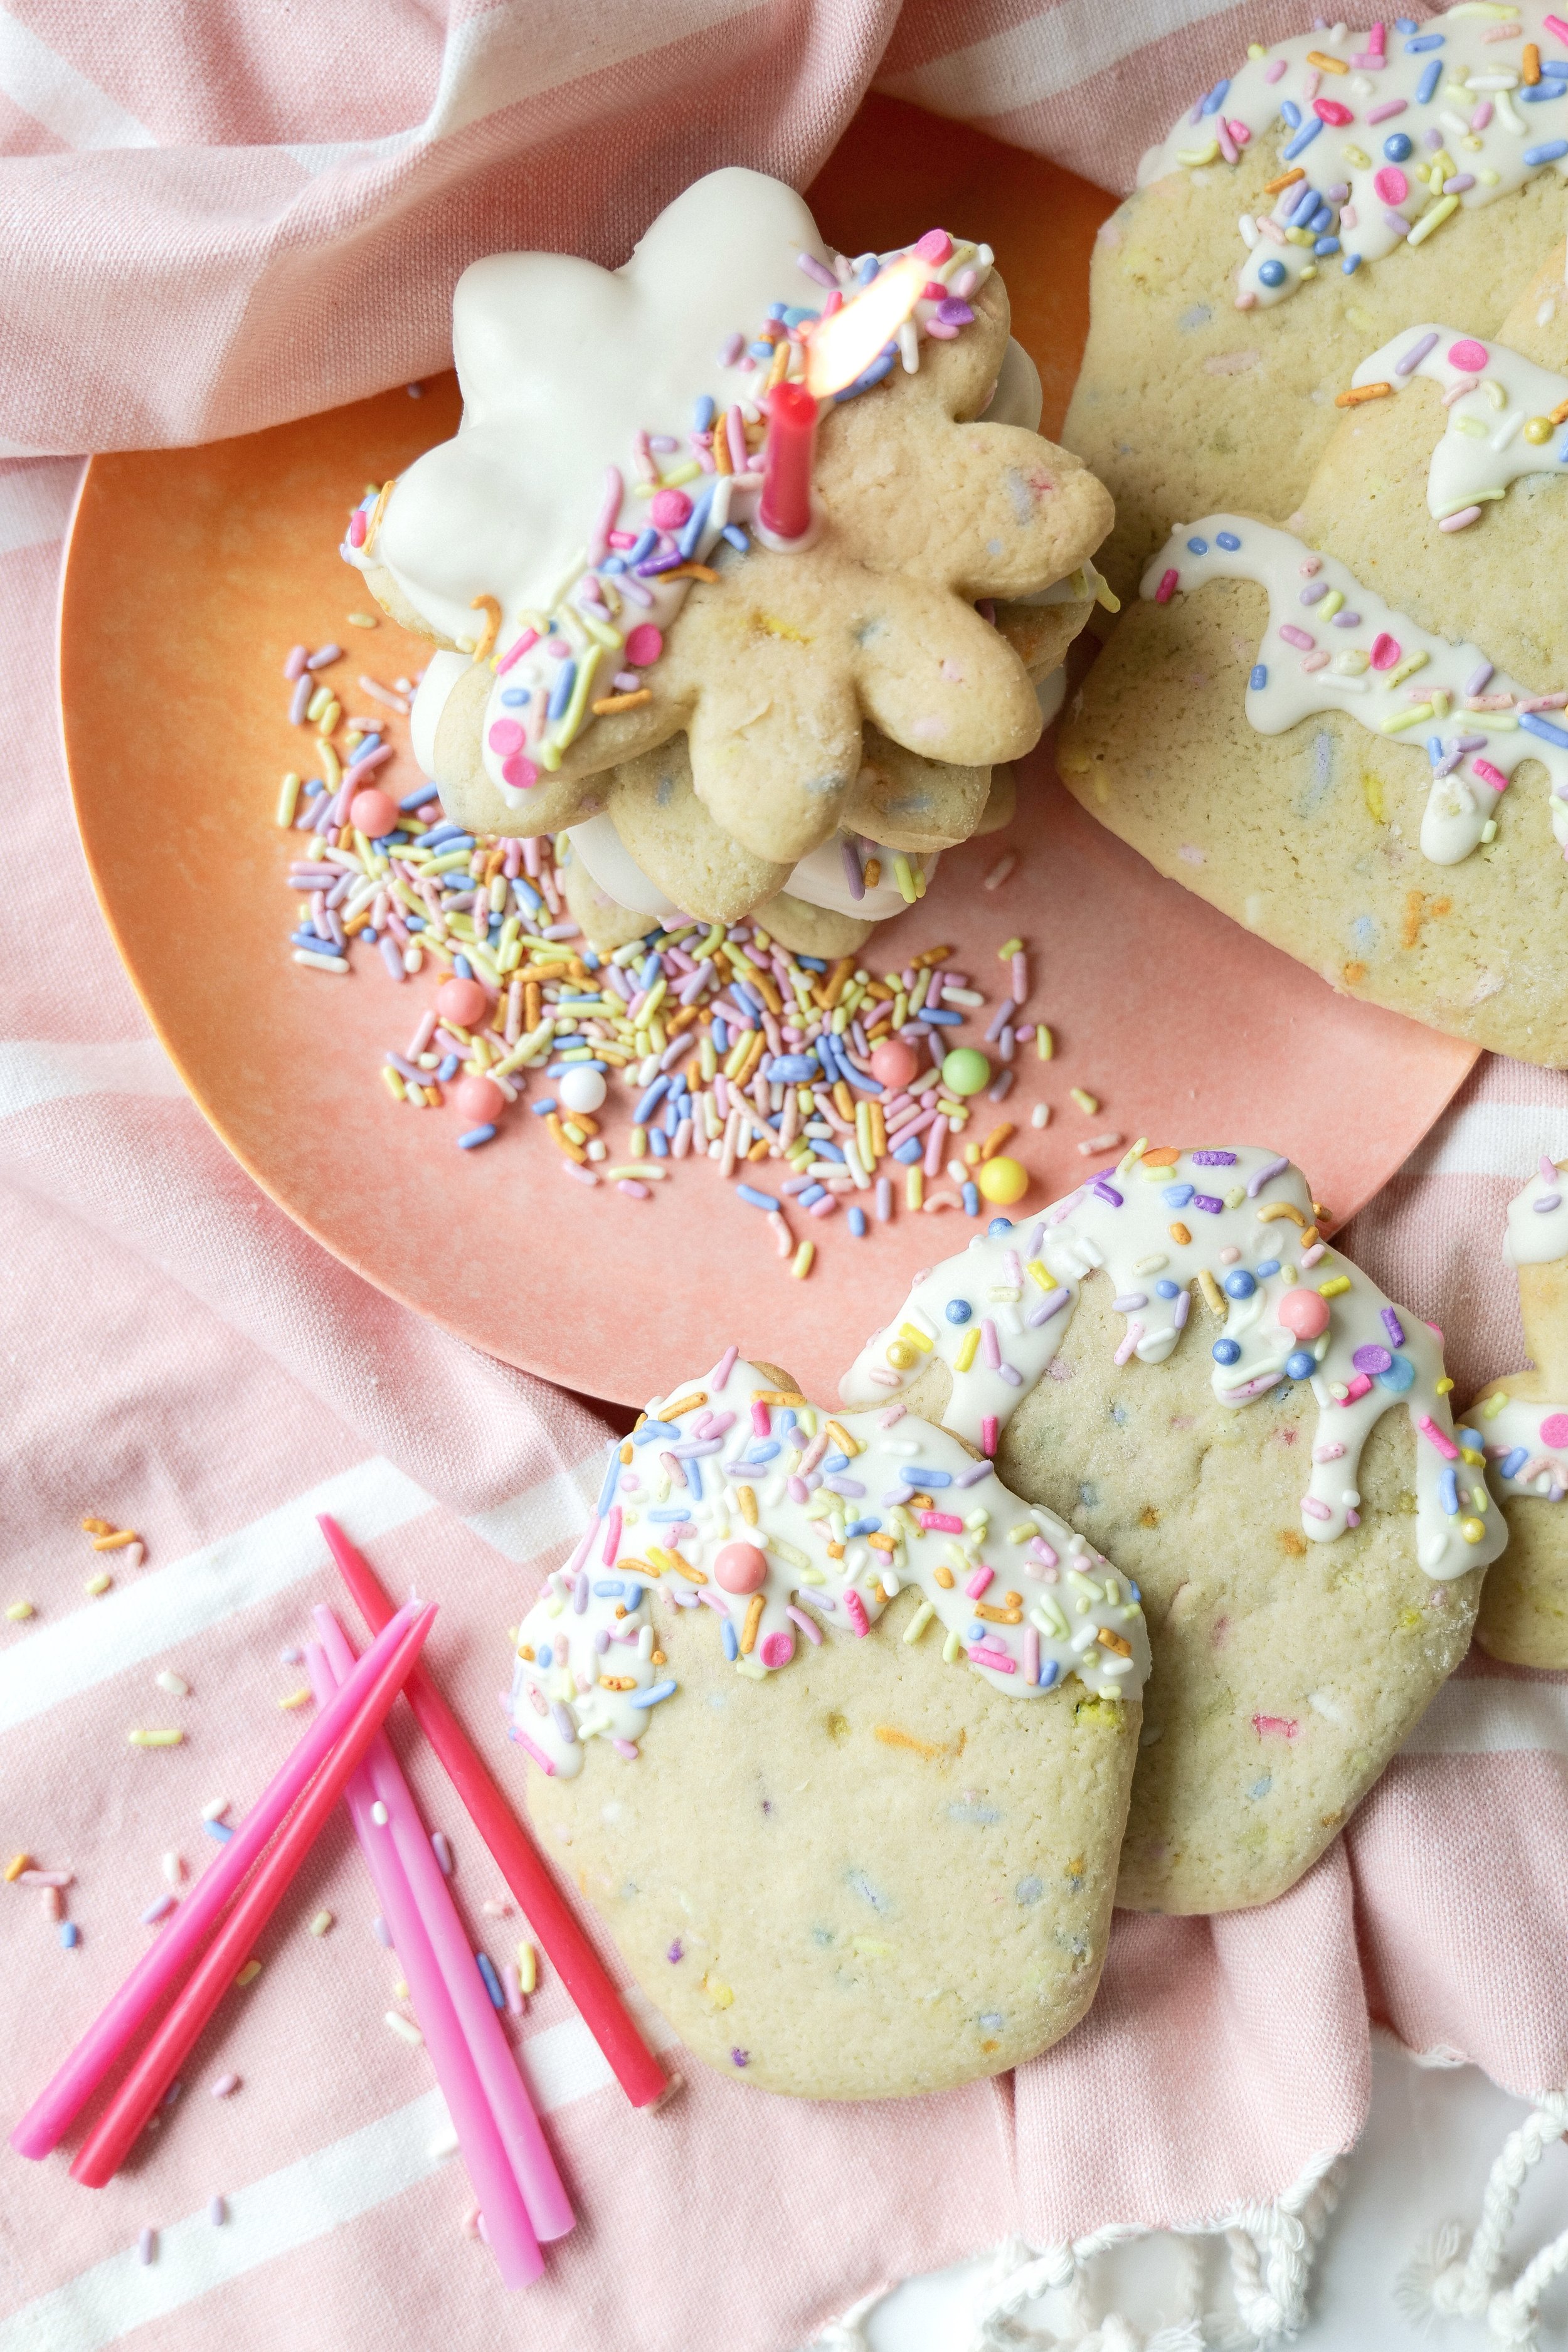
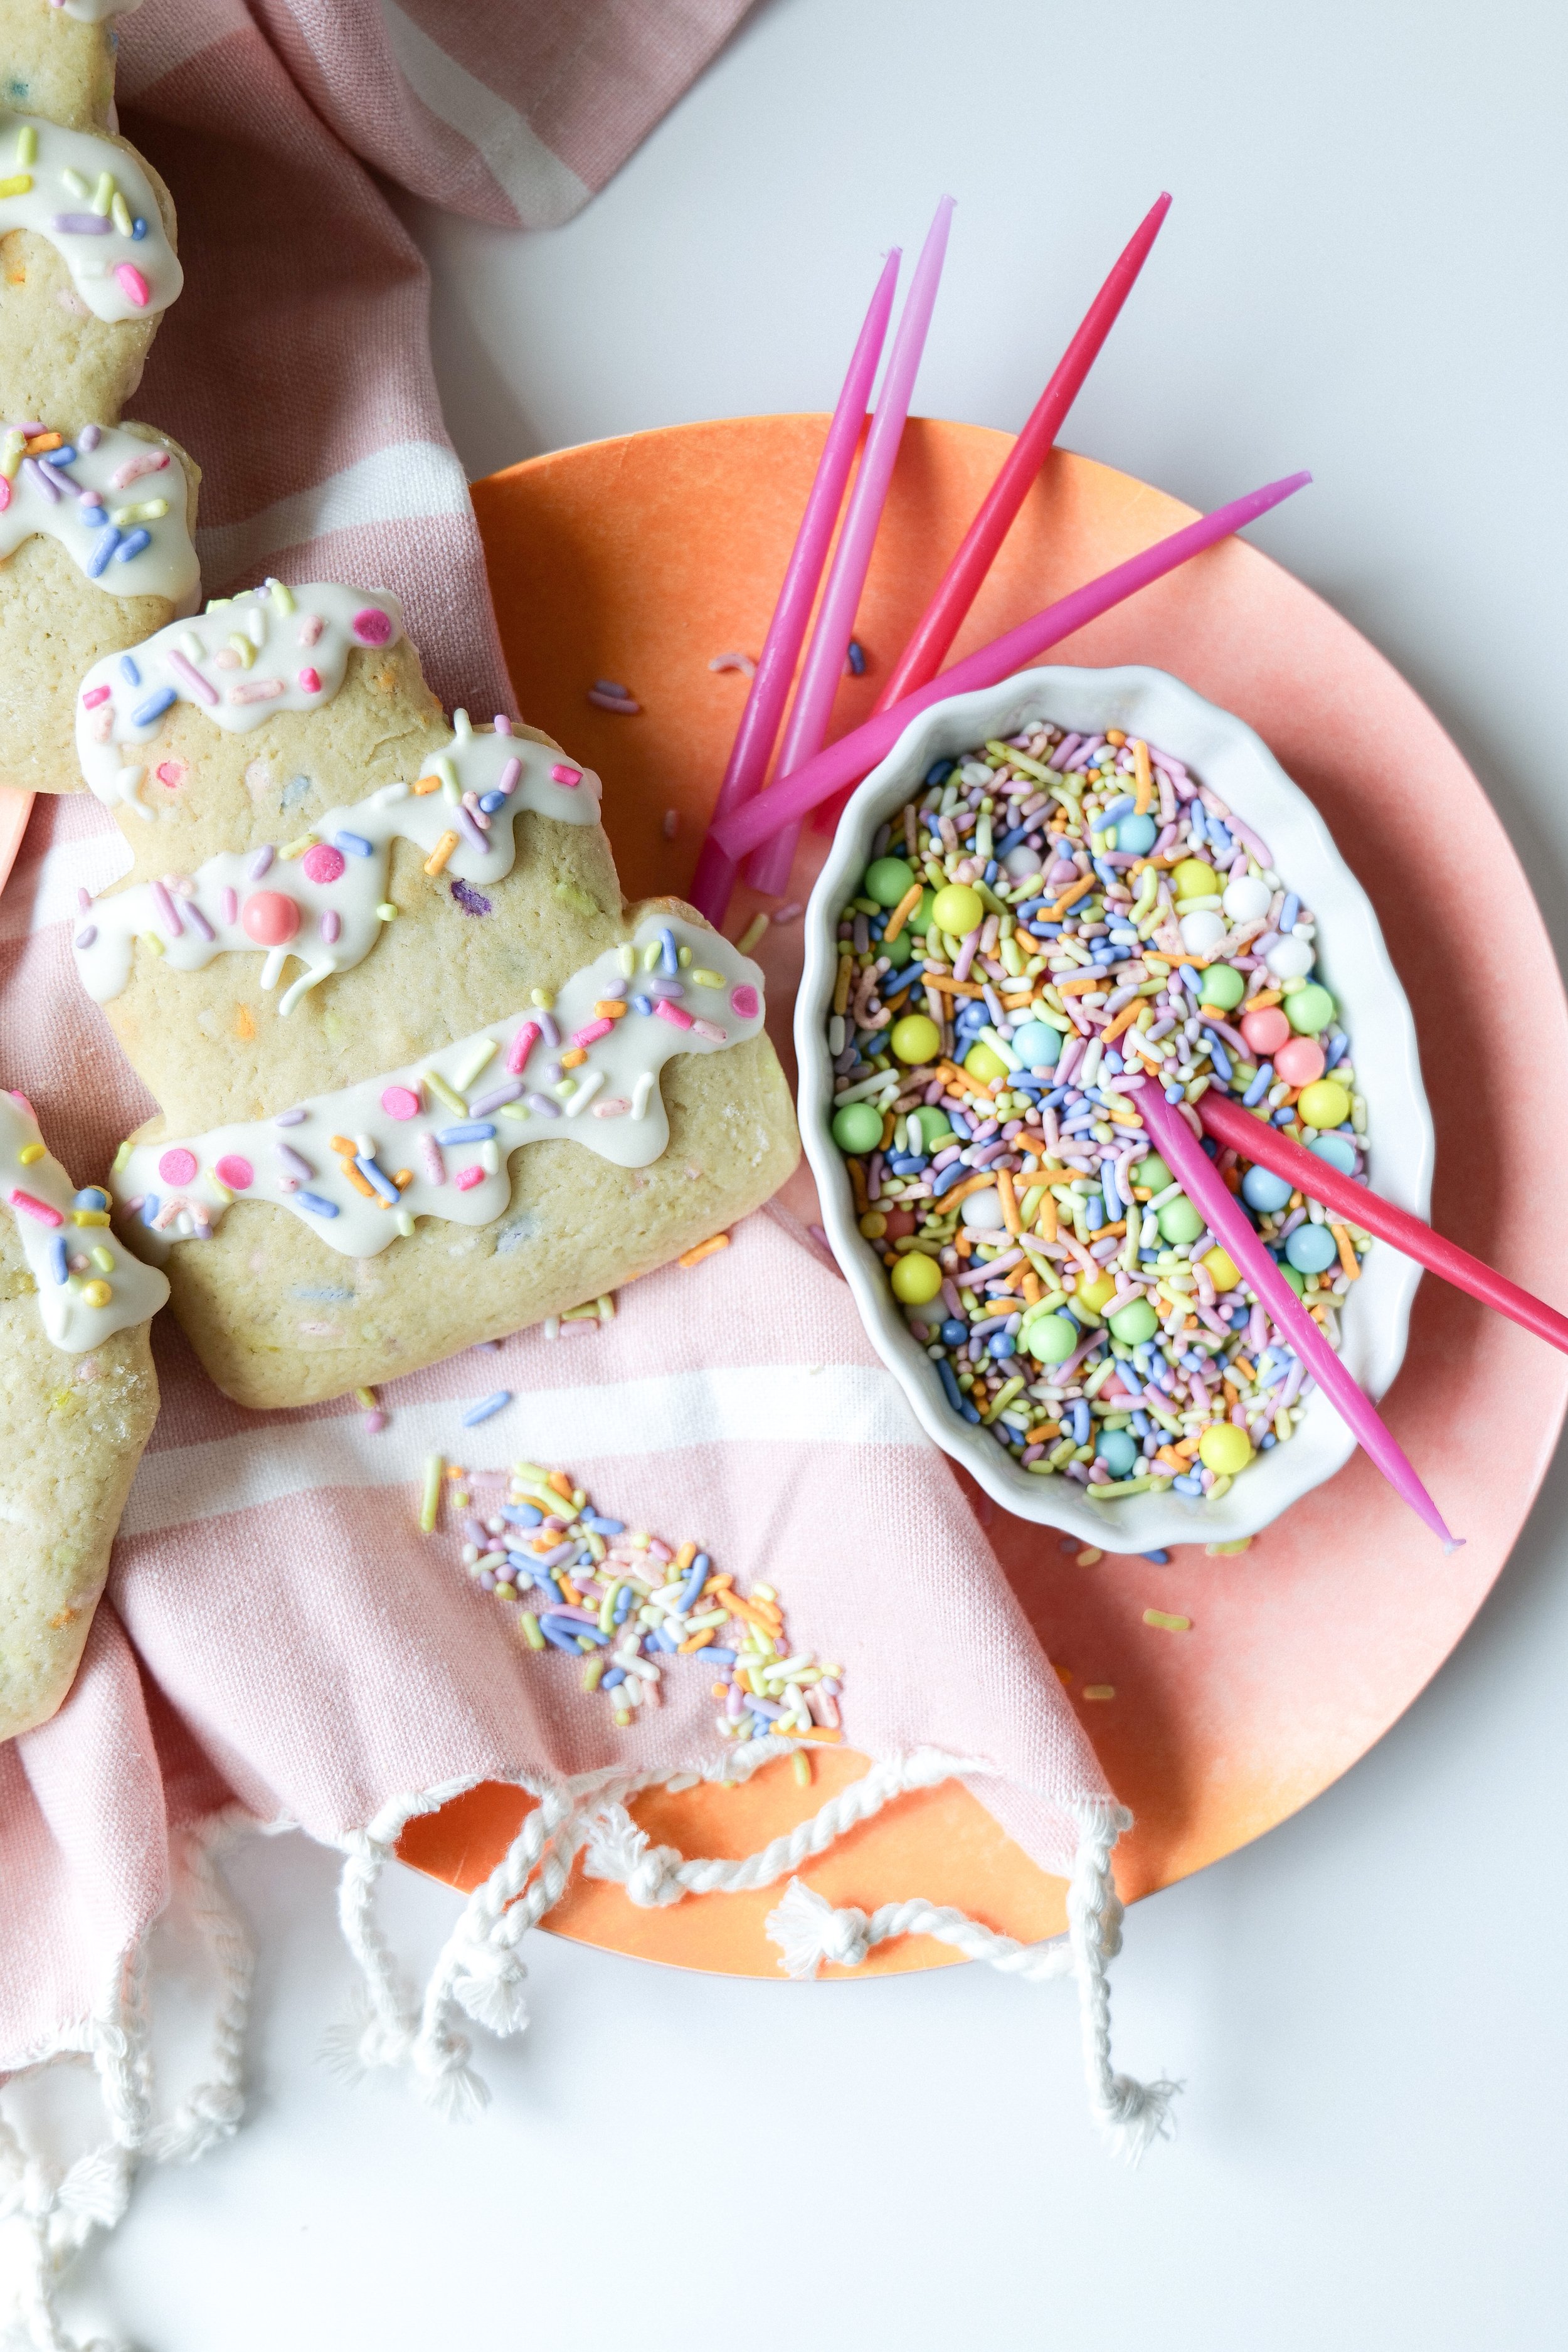
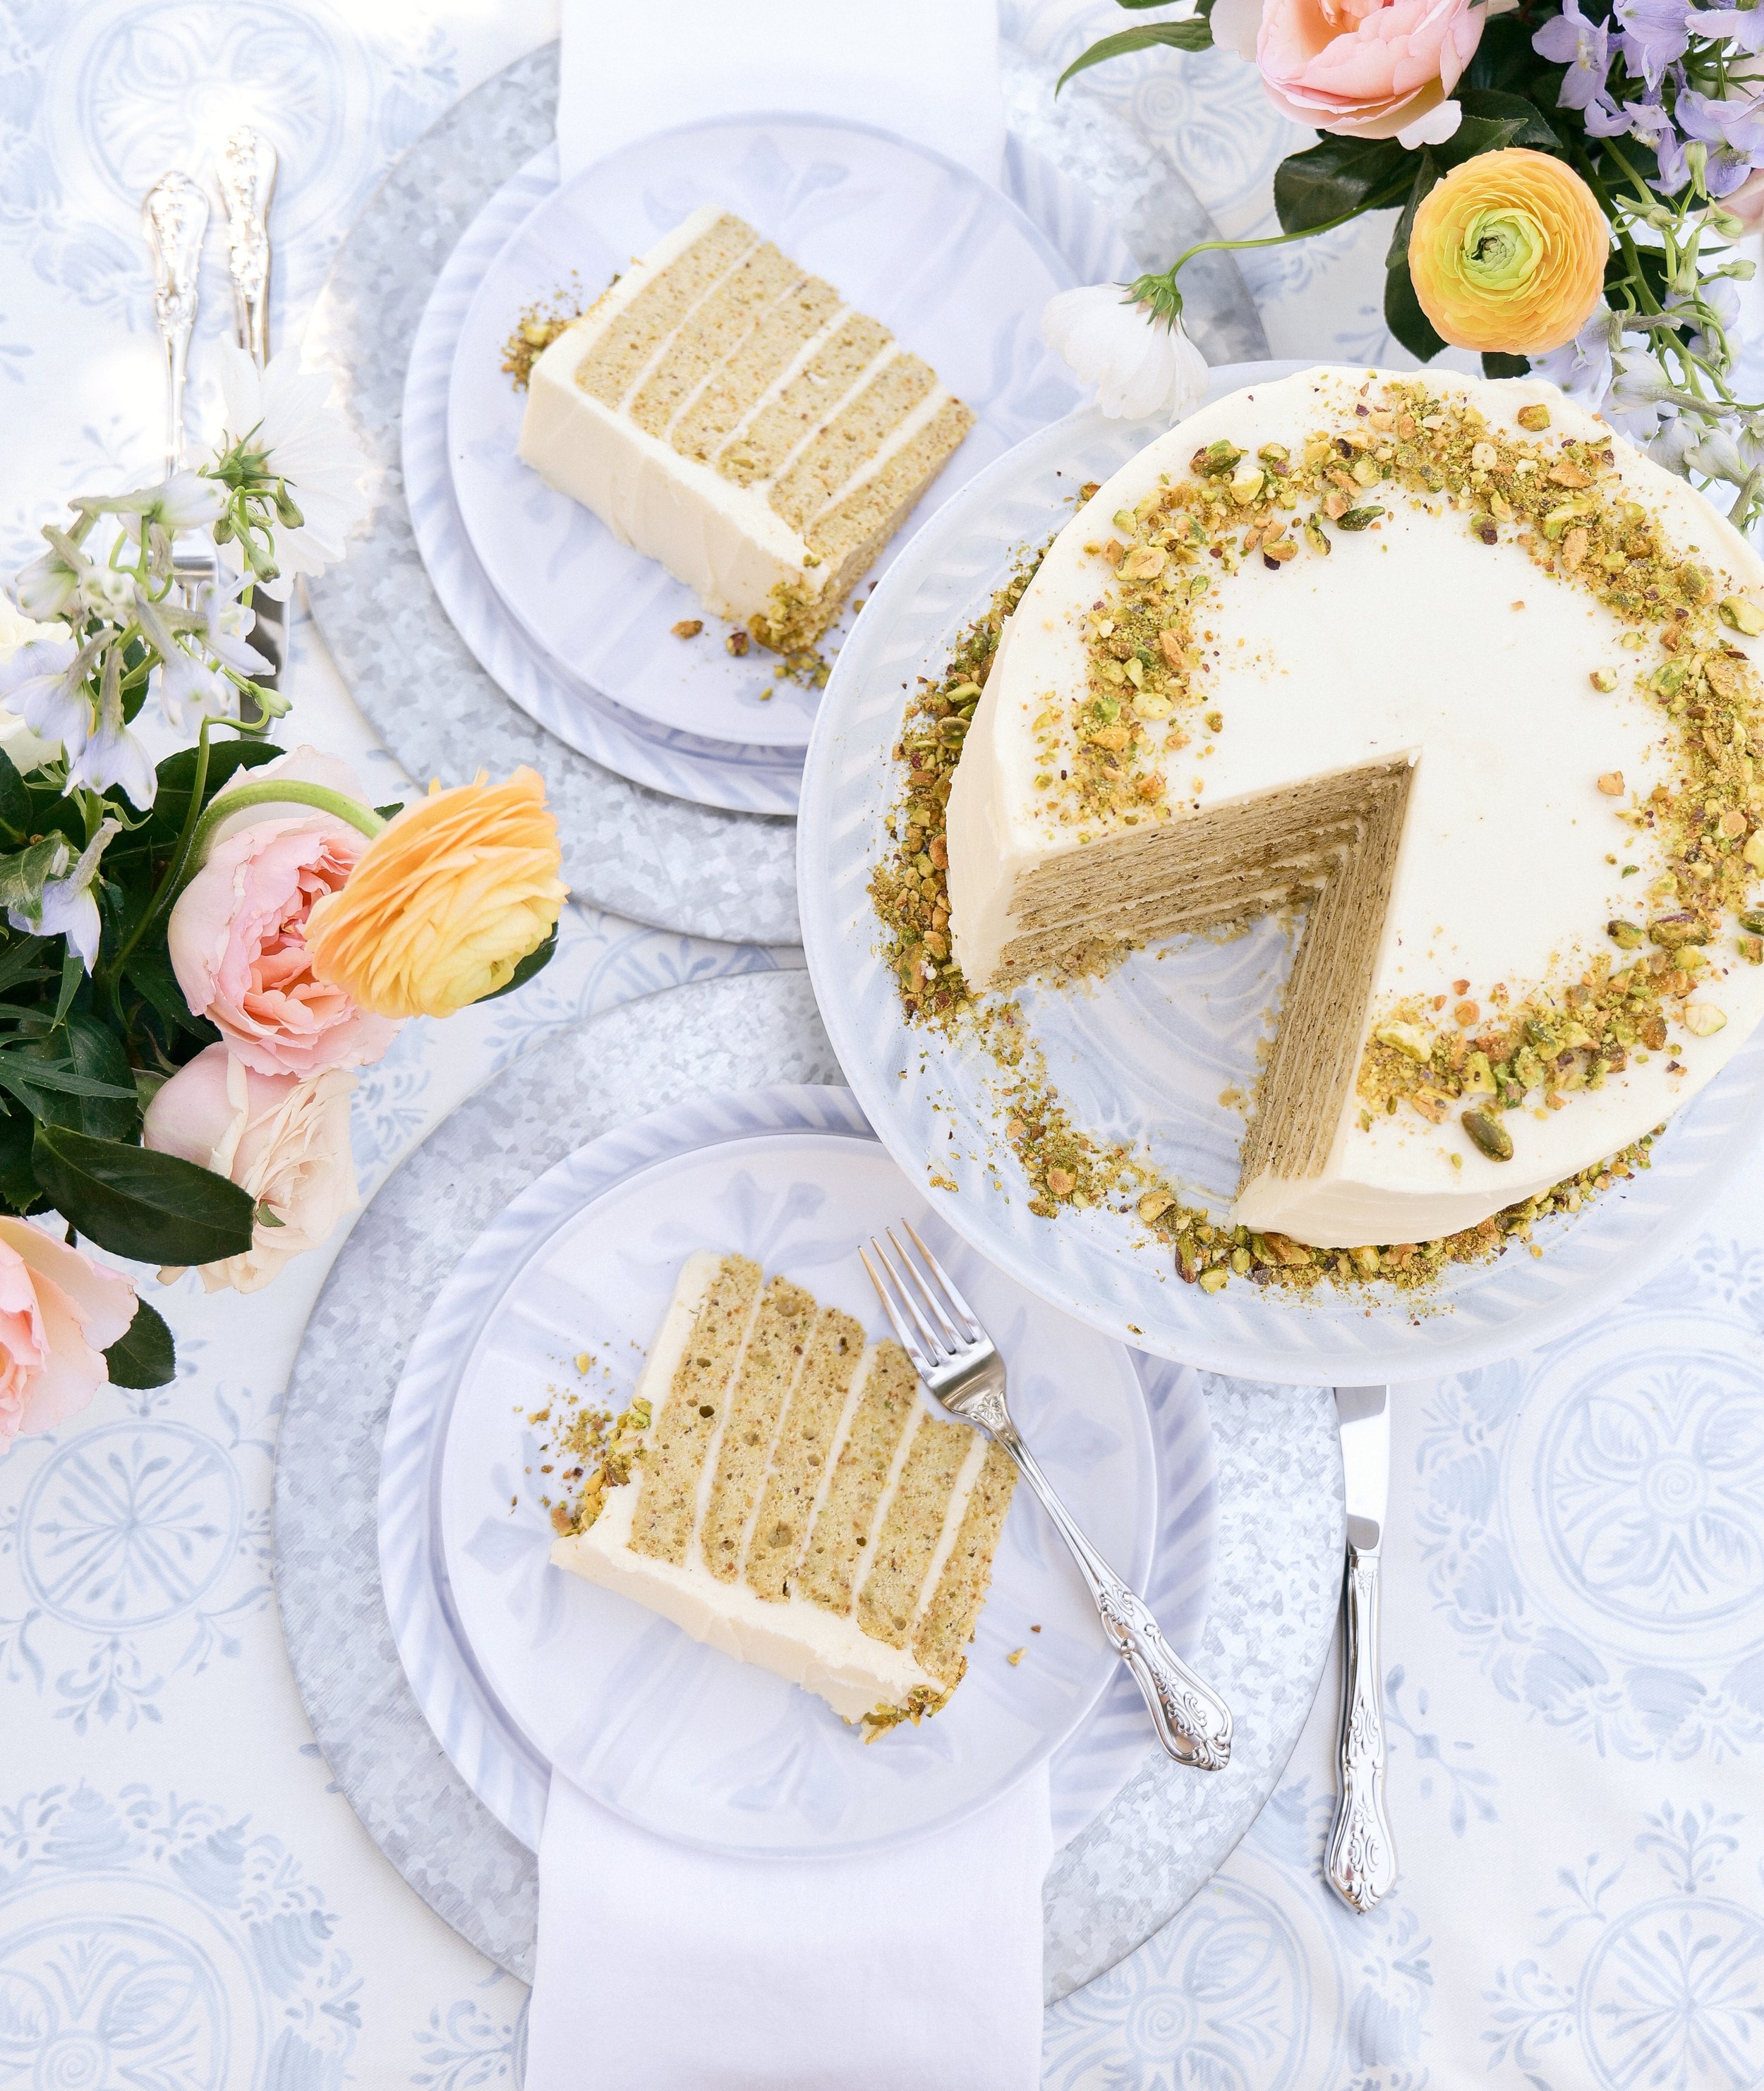
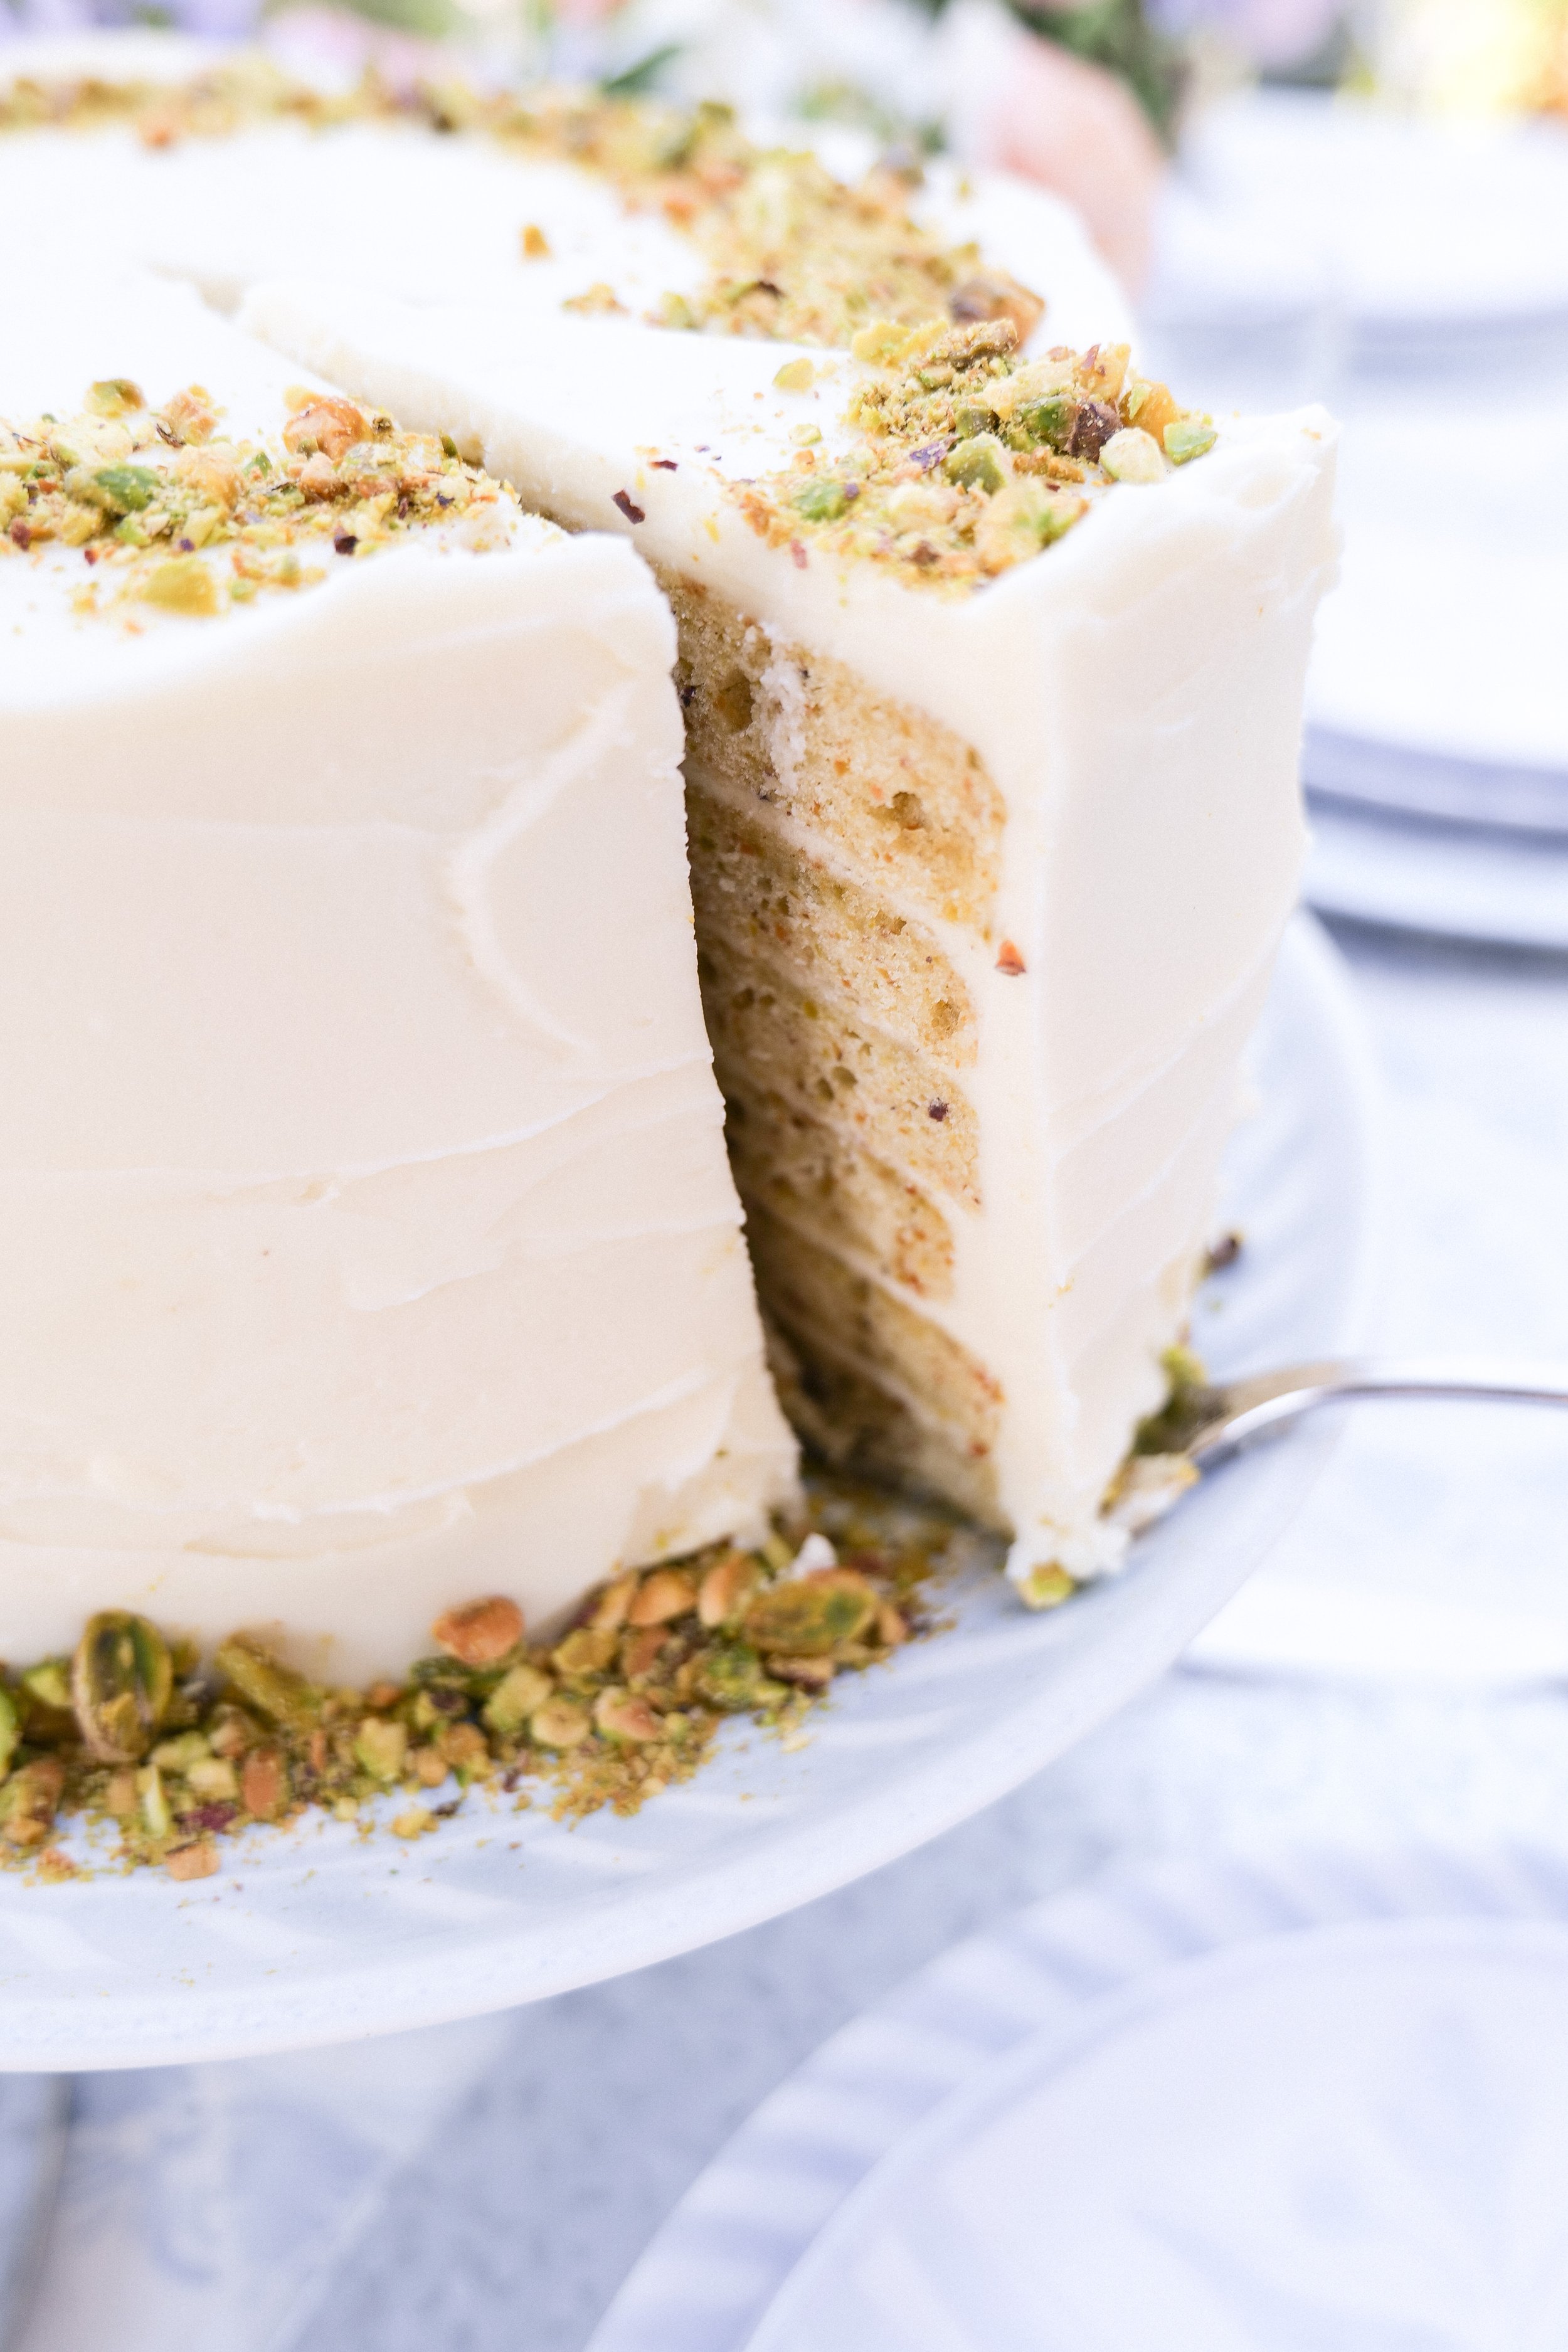
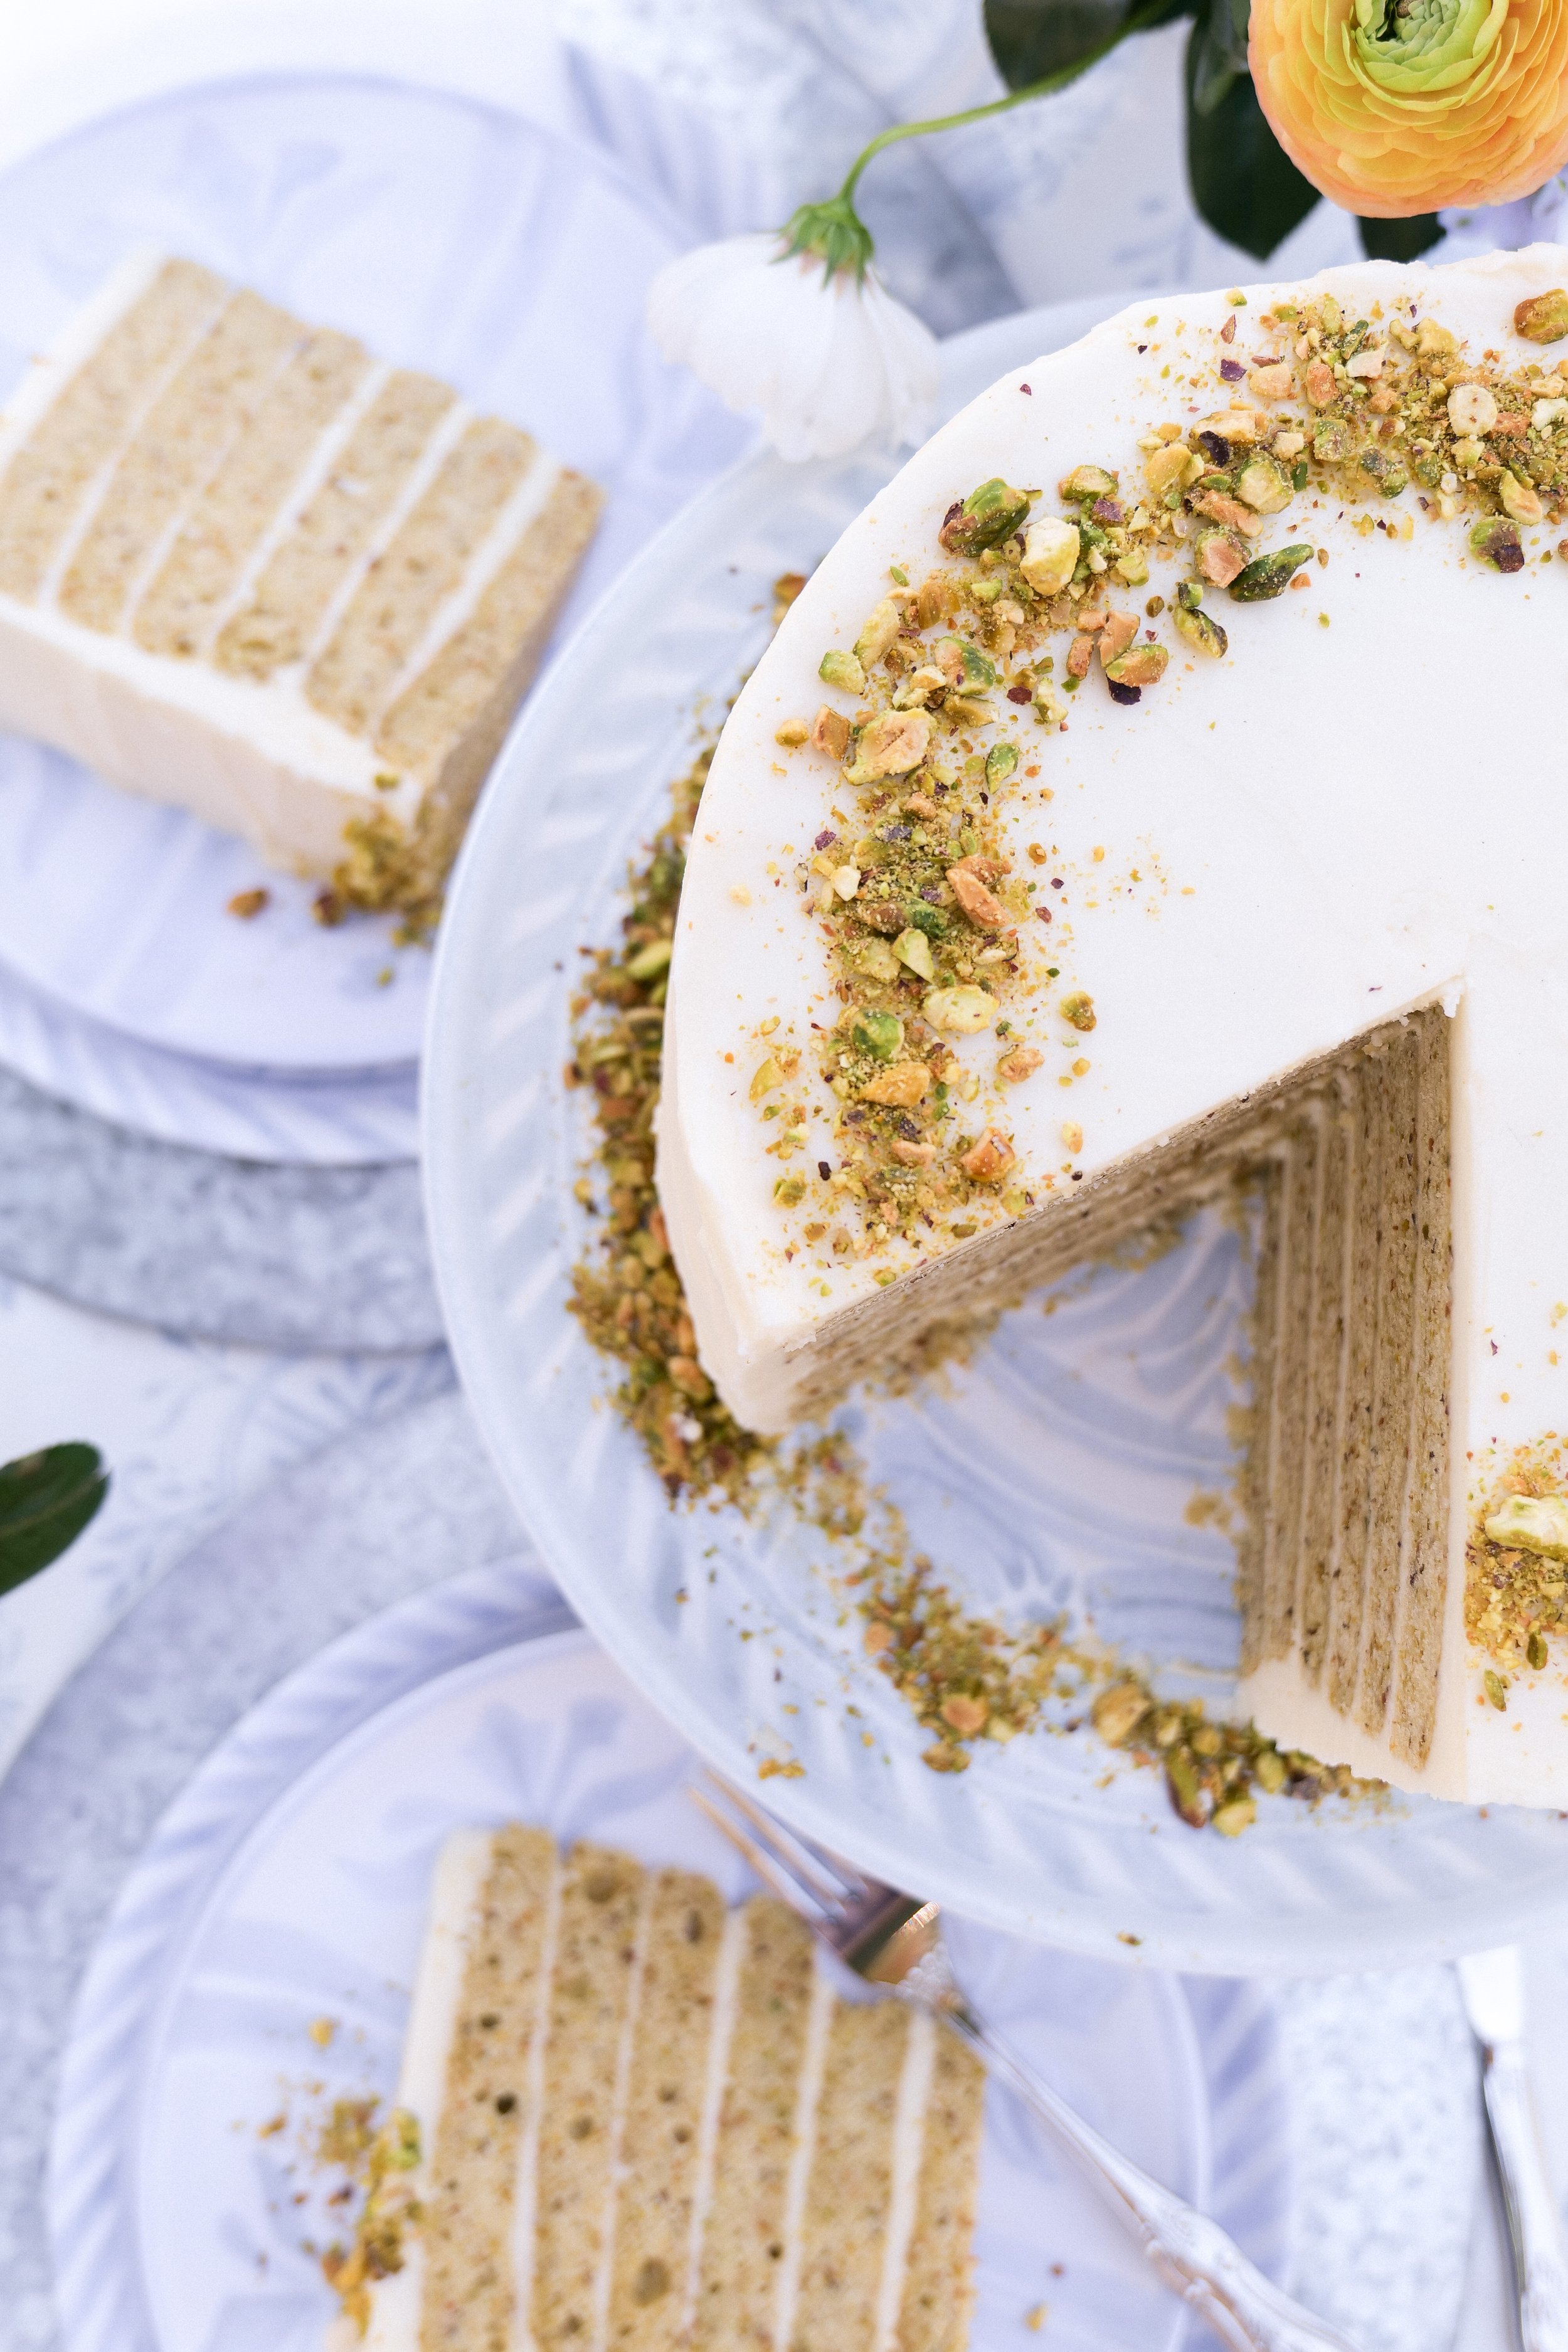
Pistachio Cake is a truly unique dessert that combines the nutty flavor of pistachios with the sweet and fluffy texture of a traditional cake. This delicious cake is made with crushed pistachios in the batter, giving it an extra crunchy and nutty texture. The crushed pistachios are also used as a topping, giving the cake a beautiful decorative element and an extra layer of flavor. Pistachio Cake has a delicate, creamy flavor that pairs well with a variety of other flavors, such as chocolate, strawberries, and caramel.

The unique flavor of pistachio makes it a great choice for special occasions, such as birthdays or anniversaries. Whether you’re looking for a unique and delicious cake for a special occasion or just want to try something new, Pistachio Cake is sure to be a hit. Its unique flavor and texture make it a great choice for any event or party. So if you’re looking to impress your guests, Pistachio Cake is the perfect dessert to make.

Does Pistachio Cake Need to Be Refrigerated?

Pistachio Cake is the perfect dessert for those days when you want to enjoy something sweet but don't want to worry about it spoiling. This delicate cake has a light and moist texture that can easily be kept at room temperature, so you don't have to worry about refrigerating it. However, the frosting does need to be refrigerated. If you want to use this recipe to make a pistachio bundt cake without frosting you can leave it out at room temperature. If you are making it as a cake with this delicious frosting then you will need to keep it in the fridge after serving due to the mascarpone in the frosting. It can stay at room temp for a few hours, just not overnight. The ease of keeping Pistachio Cake at room temperature makes it a great choice for picnics and outdoor events. You can easily transport the cake and enjoy it without worrying about it spoiling. So the next time you are looking for a delicious dessert to take to a gathering, Pistachio Cake should definitely be on the menu.

An Easy Pistachio Cake Recipe

Recipe feeds 20-24

Ingredients

2 cups shelled pistachios

2 3/4 cups cake flour

2 teaspoons baking powder

1 teaspoon sea salt

1 cup salted butter

3/4 cup granulated sugar

1 large egg

2 teaspoons pure vanilla extract

1 teaspoon almond extract

1 cup whole milk

1/2 cup sour cream

3 large eggs white

Icing

1 cup salted butter

1 teaspoon vanilla extract

1 teaspoon almond extract

5 cups powdered sugar

8 oz mascarpone

Chopped Pistachios for decorating top

Instructions

  1. Prep by oiling 3 circle pans (8 or 9 inch - my favorite are the 360 cookware with handles I will link below) and preheat oven to 350 degrees.

  2. Finely grind 1-1/2 cups pistachios in a food processor. Chop the remaining 1/2 cup for decorating cake

  3. Beat butter until creamy. Add in sugar, vanilla & almond extract, and eggs until combined

  4. Next, whisk together finely ground pistachios, flour, baking powder and sea salt.

  5. Alternate adding in dry ingredients & Milk/sour cream until all blended.

  6. In another dry bowl you will beat 3 egg whites until stiff peaks show. Fold this into the batter mixture

  7. Once combined pour into baking dish. I use 3 pans that are oiled and put into oven. 20-30 min or until a toothpick put into center comes out clean. For a taller cake like in my photos you can double this recipe making 6 layers (which will also feed more!)

  8. Blend together all frosting ingredients until incorporated. (butter should be room temp if not heat in microwave for 30 sec at a time). If doubling the cake recipe for a taller cake be sure to double the recipe for frosting.

  9. Once cake is done baking let cool in pan for 15 mins and transfer to wire rack for another 15.

  10. Ice layers of cake and do a thin layer around for a “crumb layer” that will catch all the crumbs and make a base for the final layer. Place in fridge for 30 mins and then do another final layer. Smooth, textured, whatever you desire! Add the remaining pistachios to decorate!

  11. Enjoy!

Pistachio cake is the perfect way to end a special occasion and show your guests your baking talents. Its unique flavor and texture make it an ideal choice for birthdays, weddings, and other special occasions. Pistachio cake is also incredibly easy to make and can be customized with different toppings to suit any particular occasion. The nutty flavor of pistachios makes it a great way to end an evening with friends and family. Whether you’re looking for an elegant dessert to serve on a special day or just want to add a little extra something to your next gathering, pistachio cake is sure to be a hit. Its unique flavor and texture make it a great way to show your guests that you care. The nutty flavor of pistachios is sure to add a little bit of extra flair to your next gathering. Best of all, it’s easy to make and can be customized with different toppings to make it unique and special.

Other Recipes For Your Sweet Tooth:

My Favorite White Cake Recipe

Indulge in Deliciousness: Cherry Chip Cake with Chunks of Dark Chocolate Recipe

The Most Delicious Pumpkin Coffee Cake

Tantalizingly Delicious Recipe For Lemon Cheesecake With An Amazing Glaze

Disable your ad blocking software to view this content.

Shaved Brussel Sprout Salad with Apples, Goat Cheese & Candied Pecans

The weather is warming up and with it those big, heavy, filling cold weather dishes may be slowly transitioning into !ighter and healthier colorful plates. This delicious salad is one of my favorites to enjoy anytime of year but especially in the Spring and Summer. I love to pair it with salmon or have it as a nice side dish for those Summer cookouts that are sure to come! This recipe will provide you with everything you need to make the dressing from scratch and to add in the candied pecans that are so addicting on any meal!

Ingredients:

10 -12 cups shaved Brussel sprouts

1/2 cup fresh strawberries

1/4 balsamic vinegar

1/4 raw honey

1/2 cup olive oil

1/4 tsp salt

1/4 tsp pepper

1 large apple ( I like the pink lady)

4 oz crumbled goat cheese

2 cups pecans

1/4 cup maple syrup

2 tbsp brown sugar

Directions:

  1. Make Candied Pecans so they can cool while you prepare rest of salad.

    1. line baking sheet, I use my Jelly Roll Pan from 360 cookware -here-, with parchment paper and set aside.

    2. In a pan, I use my 360 cookware 1 quart sauce pan -here-, melt together maple syrup and brown sugar until mixed and bubbling.

    3. Add in pecans and coat. Pour onto prepared baking sheet and separate nuts so they don’t stick together. Let cool.

  2. Make delicious strawberry balsamic salad dressing!

    1. Add strawberries, balsamic vinegar, raw honey, cup olive oil, tsp salt, tsp pepper into blender and blend until smooth.

    2. Place in bowl or dressing dish and set aside for later.

  3. Shave brussel sprouts. (You can always buy pre shaved however they are always a little thicker and I prefer the shavings small to taste more like a salad and less like brussel’s) To shave them I use my Mandoline slicer on 1/8th. If I am not wanting to slice it, I just buy extra bags of pre sliced and pull out all the thick chunks and use for a side of brussels later in the week.

  4. Assemble the salad. I like to put in half of the apples, half the goat cheese and half of the candied pecans add dressing and toss. Once I plate the salad I add a little of each item on the top so you can see the full color and toppings!

  5. Enjoy!

All the 360 cookware products I used in making this salad and the beautiful flatware are linked below. For a 20% discount use code AMANDA20. Works off the entire site!

Slow Cooker Orange Chicken

There is just something so convenient about making a meal in a slow cooker, especially on a busy schedule! There is so much less clean up and dinner is always ready by the time you get home from work! This super easy and delicious orange chicken recipe pairs so good with rice and is sure to be a family favorite! You can even add in cut up peppers and onions to make sure you get those veggies in! I hope you enjoy this as much as our family does!

Cook Time: 5 hours

Prep Time: 15 min

Feeds 4 people

Ingredients:

1 - 1 1/2 pounds chicken

1/3 cup cornstarch

1/2 tsp. Salt

1/2 tsp. Pepper

1/2 cup orange marmalade

2 tbsp coconut aminos

1/2 tsp rice vinegar

1/2 tsp sesame oil

2 garlic cloves (minced)

1/2 tsp chili garlic sauce

Toppings:

sesame seeds

green onions

orange slices

Instructions:

  1. Cut thawed chicken into 1inch cubes and toss with corn starch salt and pepper.

  2. Spray slow cooker with olive oil spray and layer chicken into bottom.

  3. In a bowl whisk together rest of ingredients (excluding toppings)

  4. Pour whisk sauce over chicken and toss.

  5. Turn on slow cooker to 2 and cook for 5 hrs.

I love using the 360 slow cooker! It’s so easy to use and everything comes out perfect! I love it’s stainless steel look and of course love that it’s made in the good ol’ USA! For more info Click -HERE-. To shop entire site with 20% off use code AMANDA20

Brown Sugar Toffee Cookies

This cookie recipe has 3 of my favorite yummy ingredients: Brown Sugar, Brown Butter & Toffee!! That’s a lot of delicious goodness all cooked on my 360 cookware!! I love using 360 because for one its all made in the USA! I always love supporting companies and products made in the USA and work hard to find them. Second.. they are the best pans I have used particularly for making cookies hands down! They all are non toxic and so easy to clean. I cant say enough good things about them..They also have bowls that are just as amazing. To share my love I have a code for 20% off! Use code AMANDA20 to get 20% off your next purchase. Start shopping -here-

Brown Sugar Toffee Cookie Recipe

Toffee Recipe :

1 cup cubed salted butter

1 cup white sugar

1 tsp vanilla

  1. On low heat mix cubed butter and sugar. Using a spatula continue to stir to prevent from burning

  2. Once color starts to change add in vanilla

  3. Once color starts to look like peanut butter pour onto parchment paper

  4. Let cook for 10-20 min.

  5. Crack! You are ready to enjoy AND add into cookies!

Cookie Recipe:

1 cup brown butter

2 cups brown sugar (I do one of these dark brown but totally optional)

2 eggs

1 tsp vanilla

4 cups flour

1 tsp salt

4 tsp baking powder

1/2 cup milk

toffee

sea salt for topping

  1. Brown butter in a sauce pan. I do this first because it needs to cool. Once butter starts browning in color and smells nutty you can put in a bowl to cool

  2. Preheat oven to 375

  3. Once butter is cooled enough (I usually give it at least 20-30 min, while I am making toffee) blend butter and brown sugar.

  4. Add in eggs and vanilla and mix well.

  5. Stir dry ingredients in a separate bowl. Alternating between dry and milk adding into wet ingredients.

  6. Lastly add in toffee. You can use as much of the recipe from toffee as you want! Save some to add on the side of cookies, eat, or enjoy it all in the cookies.

  7. I take a cookie scoop and do 2 scoops one on top of each other then sprinkle the top with sea salt. This gives a nice fluffy cookie.

  8. Bake for 11-13 min.

  9. ENJOY!

A Taste of Heaven: Deliciously Easy Apple Pie!

If you are looking for a sweet and delicious dessert that is easy to make, look no further than this delicious & easy apple pie recipe! This classic treat tops the list as the #1 favorite for many dessert lovers, and it doesn't have to be difficult to make. In this blog post, we will be going over all the steps to make a delicious and easy apple pie that you and your family can enjoy. We'll also be discussing some of the tips and tricks to make sure your pies come out perfect every time. So, get ready to make the most scrumptious apple pie you've ever tasted!

Everyone loves this classic and timeless treat that can be quickly and easily whipped up with minimal ingredients. All you need is apples, sugar, flour, butter, and cinnamon. To make the pie even more special, you can add different toppings such as nuts, raisins, or of course a scoop of ice cream. As the delicious aroma of baking apples and spices fills your home, your family and anyone coming over will surely be delighted!

Easy Part 1: Store-Bought Crust

Apple pie is a classic dessert that is sure to please any crowd. But it can be time-consuming to make from scratch, especially when it comes to making the pie crust. Luckily, there is an easy and delicious way to make an apple pie with minimal effort - using a store-bought pre-made pie crust. This easy apple pie recipe requires minimal ingredients and is great for those who are short on time or are new to baking. The trick to making this recipe successful is to use a good quality store-bought crust. This makes this recipe easier and even more enjoyable. I love to get the double pack and make fun designs on the top with cookie cutters and crisscrossing them. This also makes your pie unique and special.

I always try my hardest to make the best homemade desserts, but I know when the experts have some things figured out better then me.. Like pie crust. I had a hard time trying to make the perfect pie crust so I finally gave up and focused all my energy on the filling! One delicious filling, a store-bought crust and the best pie pan make for a killer apple pie everyone will rave over!!

I am using the 360 cookware pie pan. The pan is made with 5-Ply construction and has a T-304 surgical stainless steel baking surface. No other bakeware cooks so evenly and perfectly as this pie pan! The Pie Pan is covered by a Lifetime Warranty like all of their products making this a legacy pan you can pass down for years to come. Better yet, they are all 100% American Made! Every pan I have used from them has cooked everything so well. This pie pan was nothing short of amazing and not one piece stuck to the pan! That was always irritating for me in the past, but now those worries are gone!

The Best Apples for Apple Pie

Apple pie is a classic dessert that is loved by many. The key to making a great apple pie is to choose the right type of apple. Granny Smith apples are a tart and firm classic choice for a delicious apple pie. Sweet, juicy, and crisp Honeycrisp apples are the perfect balance of tart and sweet. Braeburn apples are full of flavor and hold their shape when baked, making them an ideal choice. For a sweeter pie, Golden Delicious apples add a hint of tartness and are great for baking pies. Finally, Jonathan apples are sweet and tart, making them a great addition of flavor and texture to your apple pie. I like to mix 2 or 3 different apple types to give each bite a unique and delicious flavor. Two of my favorites are the Granny Smith and Golden Delicious together. With these apples in hand, you’re ready to make a delicious & easy apple pie.

20201114-warren-laurenwestra-175.jpg

Apple Pie Ingredients

2 store-bought roll-out crusts

7 cups thinly sliced apples (I like to do a mix of two different types of apples)

1 1/2 teaspoons cinnamon

1/2 cup melted butter

3 tablespoons all-purpose flour

1/4 cup water

1 cup sugar

1 egg with 1 tablespoons water mixed for egg washing

Instructions

1. Take out pie crust and pre-heat oven to 425

2. Peel and cut apples into evenly thinly sliced pieces. Place in a large bowl with cinnamon and toss.

3. Melt butter in the microwave until completely melted. Whisk in flour, water and lastly sugar blending until it all comes together. After fully mixed pour in the apple mixture and fully blend.

4. Take pie crusts that have been sitting out and roll over a sprinkle of flour. Take store-bought crust and lay it over a pre-oiled pie pan. Fill the pan with the apple mixture. Lastly, for the design of your pie the options are endless! I did a crisscross pie here and used extra dough with leaf cookie cutters to make the top even more fun!

5. Once the top is all designed and ready to go use egg wash mixture (1 egg and 1 tbsp water whisked) and brush onto dough.

6. Bake at 425 for 15 min and then reduce heat to 350 and bake for another 45 min or until apples are a soft consistency.

20201114-warren-laurenwestra-195.jpg

You can enjoy your pie right away with vanilla ice cream, let it come to room temperature, or keep refrigerated for the next day. Anyway that you enjoy it I promise you wont be disappointed! The combination of sweet apples, cinnamon, and sugar make this pie a heavenly treat. Whether you are looking for something to end a meal on a sweet note or just a special treat, this apple pie is the perfect choice.

Other Desserts and Comfort Food you will love:

The Ultimate Thanksgiving Dessert - My Pumpkin Crisp Recipe

Chocolate Peanut Butter Brownies

Scotty's Birthday Pistachio Cake

My Favorite White Cake Recipe

Brown Butter Caramel Pretzel Cookies

The Most Delicious Pumpkin Coffee Cake

I hope you enjoy this apple pie just as much as I do! Click -HERE- for my favorite pie pan for the perfect pie all year long! You can also use code “Amanda20” for 20% off the entire 360 cookware site!

20201114-warren-laurenwestra-171.jpg
20201114-warren-laurenwestra-65.jpg
20201114-warren-laurenwestra-170.jpg
20201114-warren-laurenwestra-67.jpg