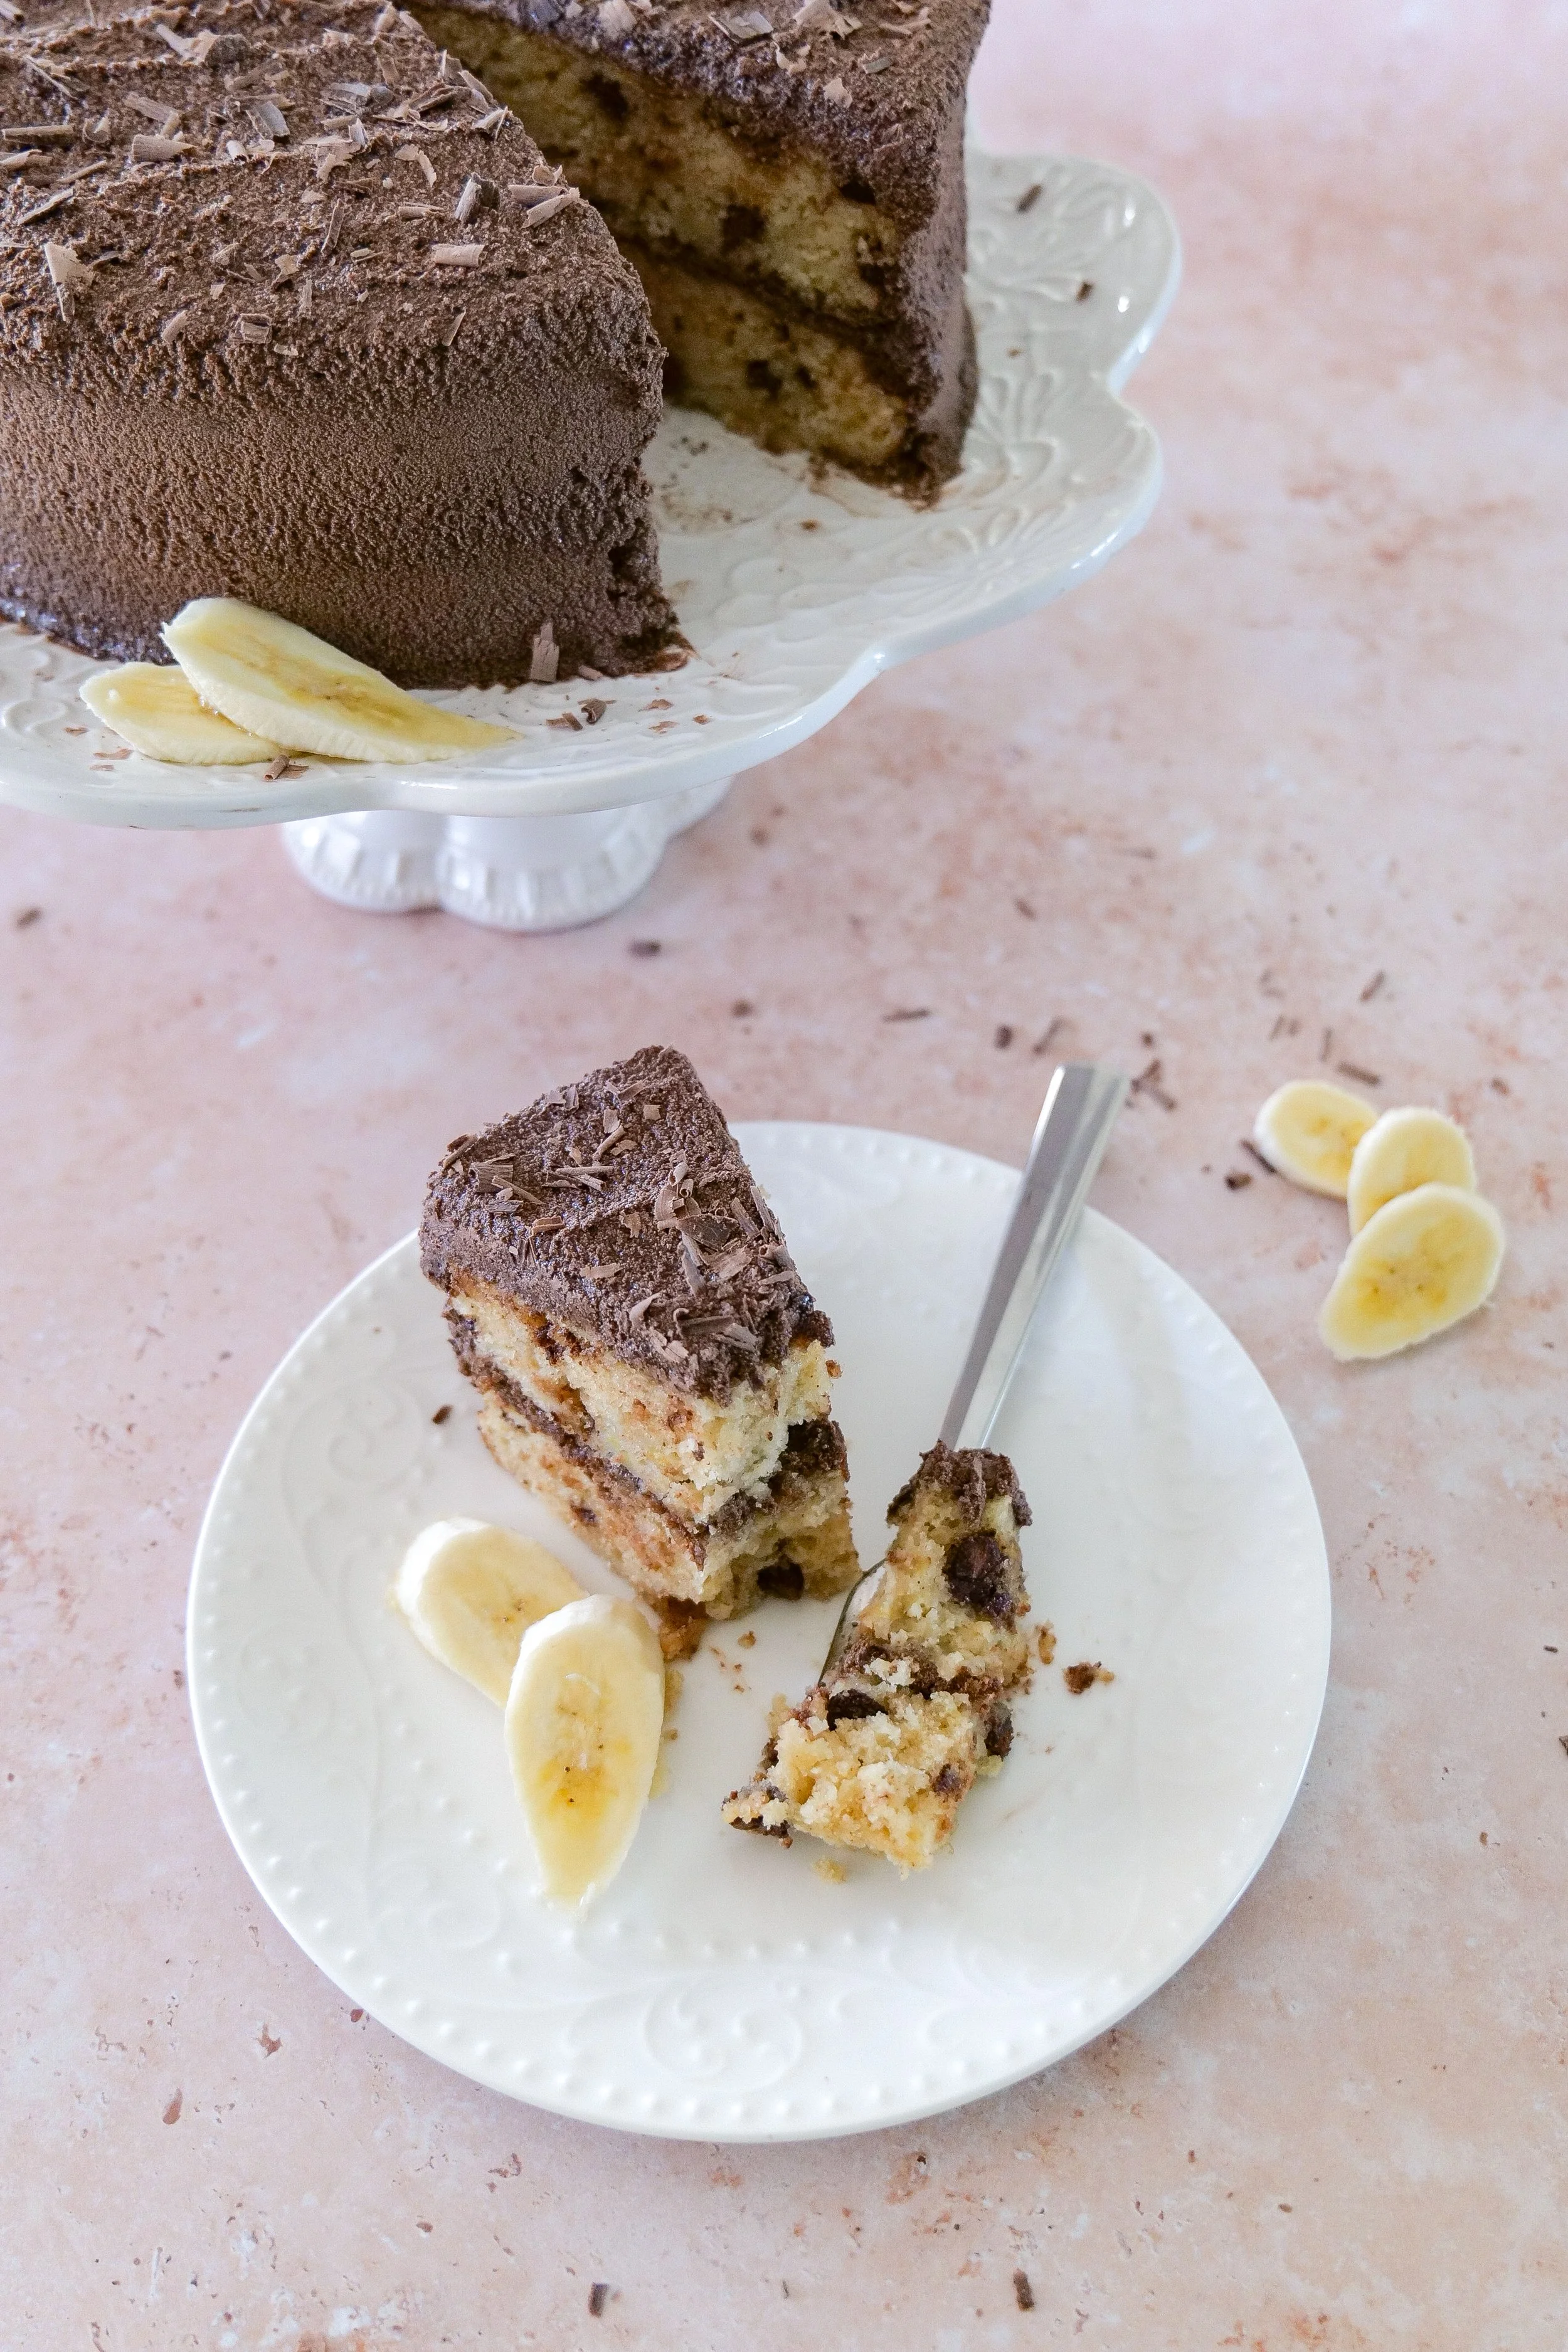
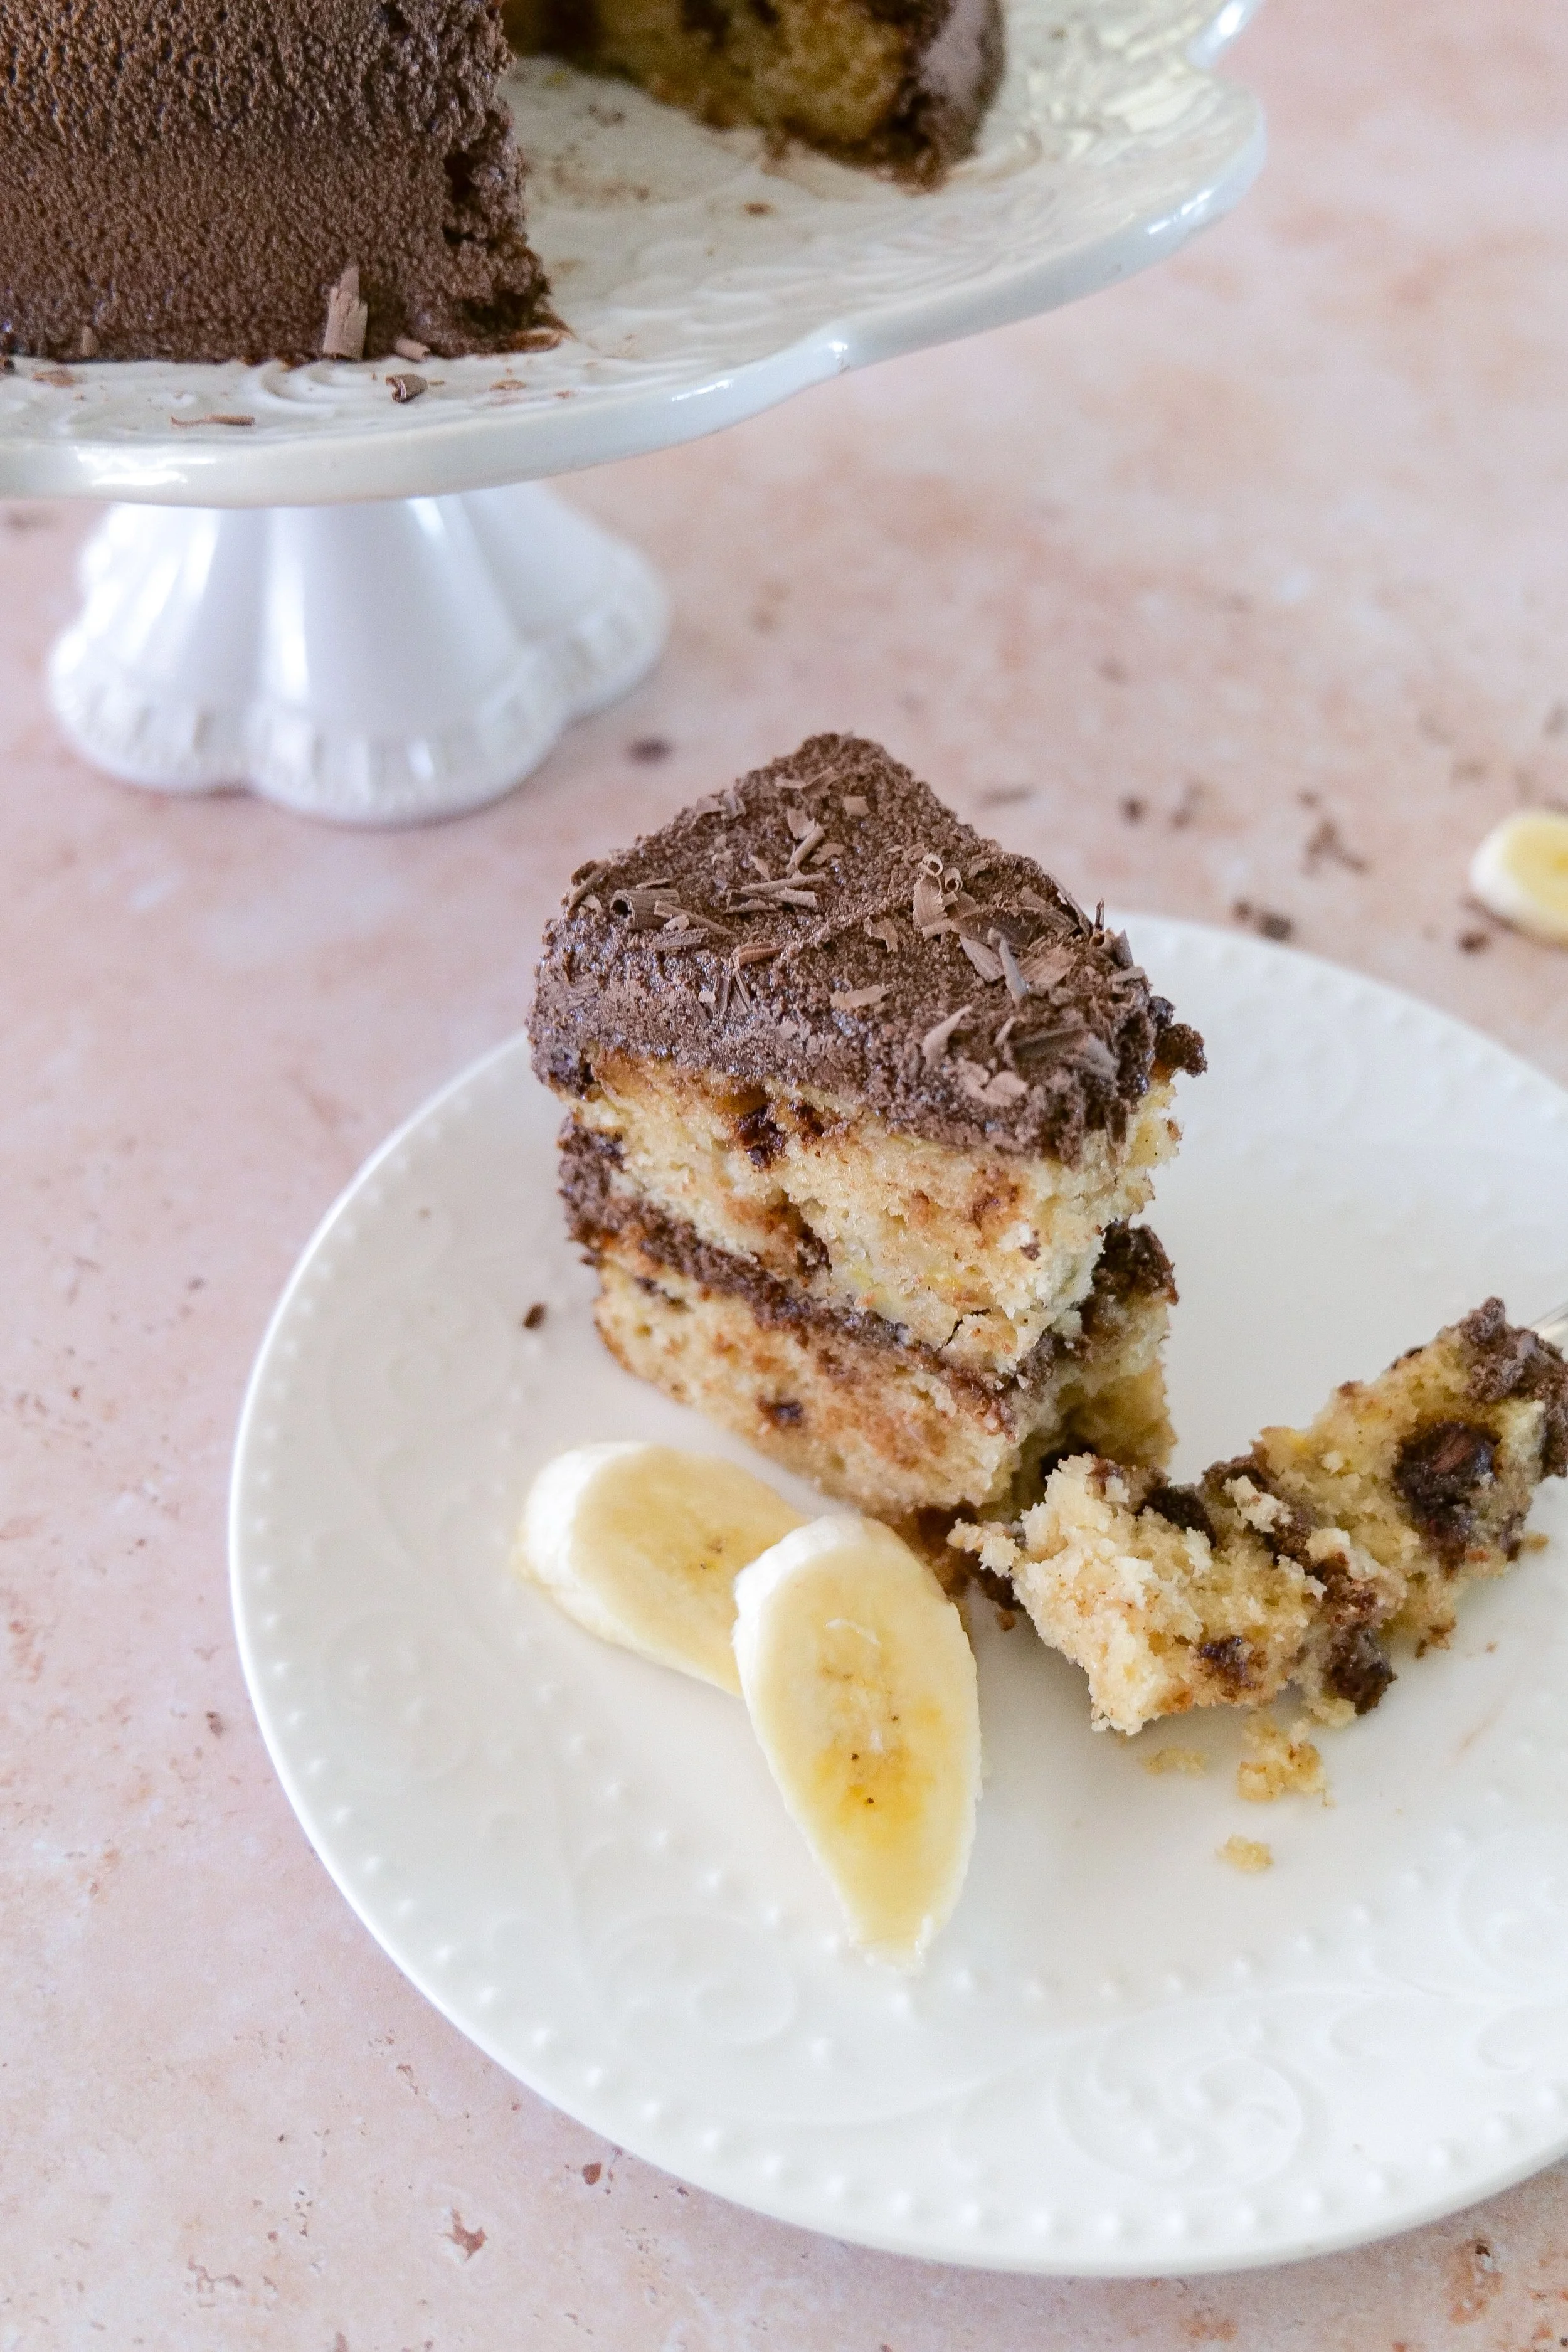
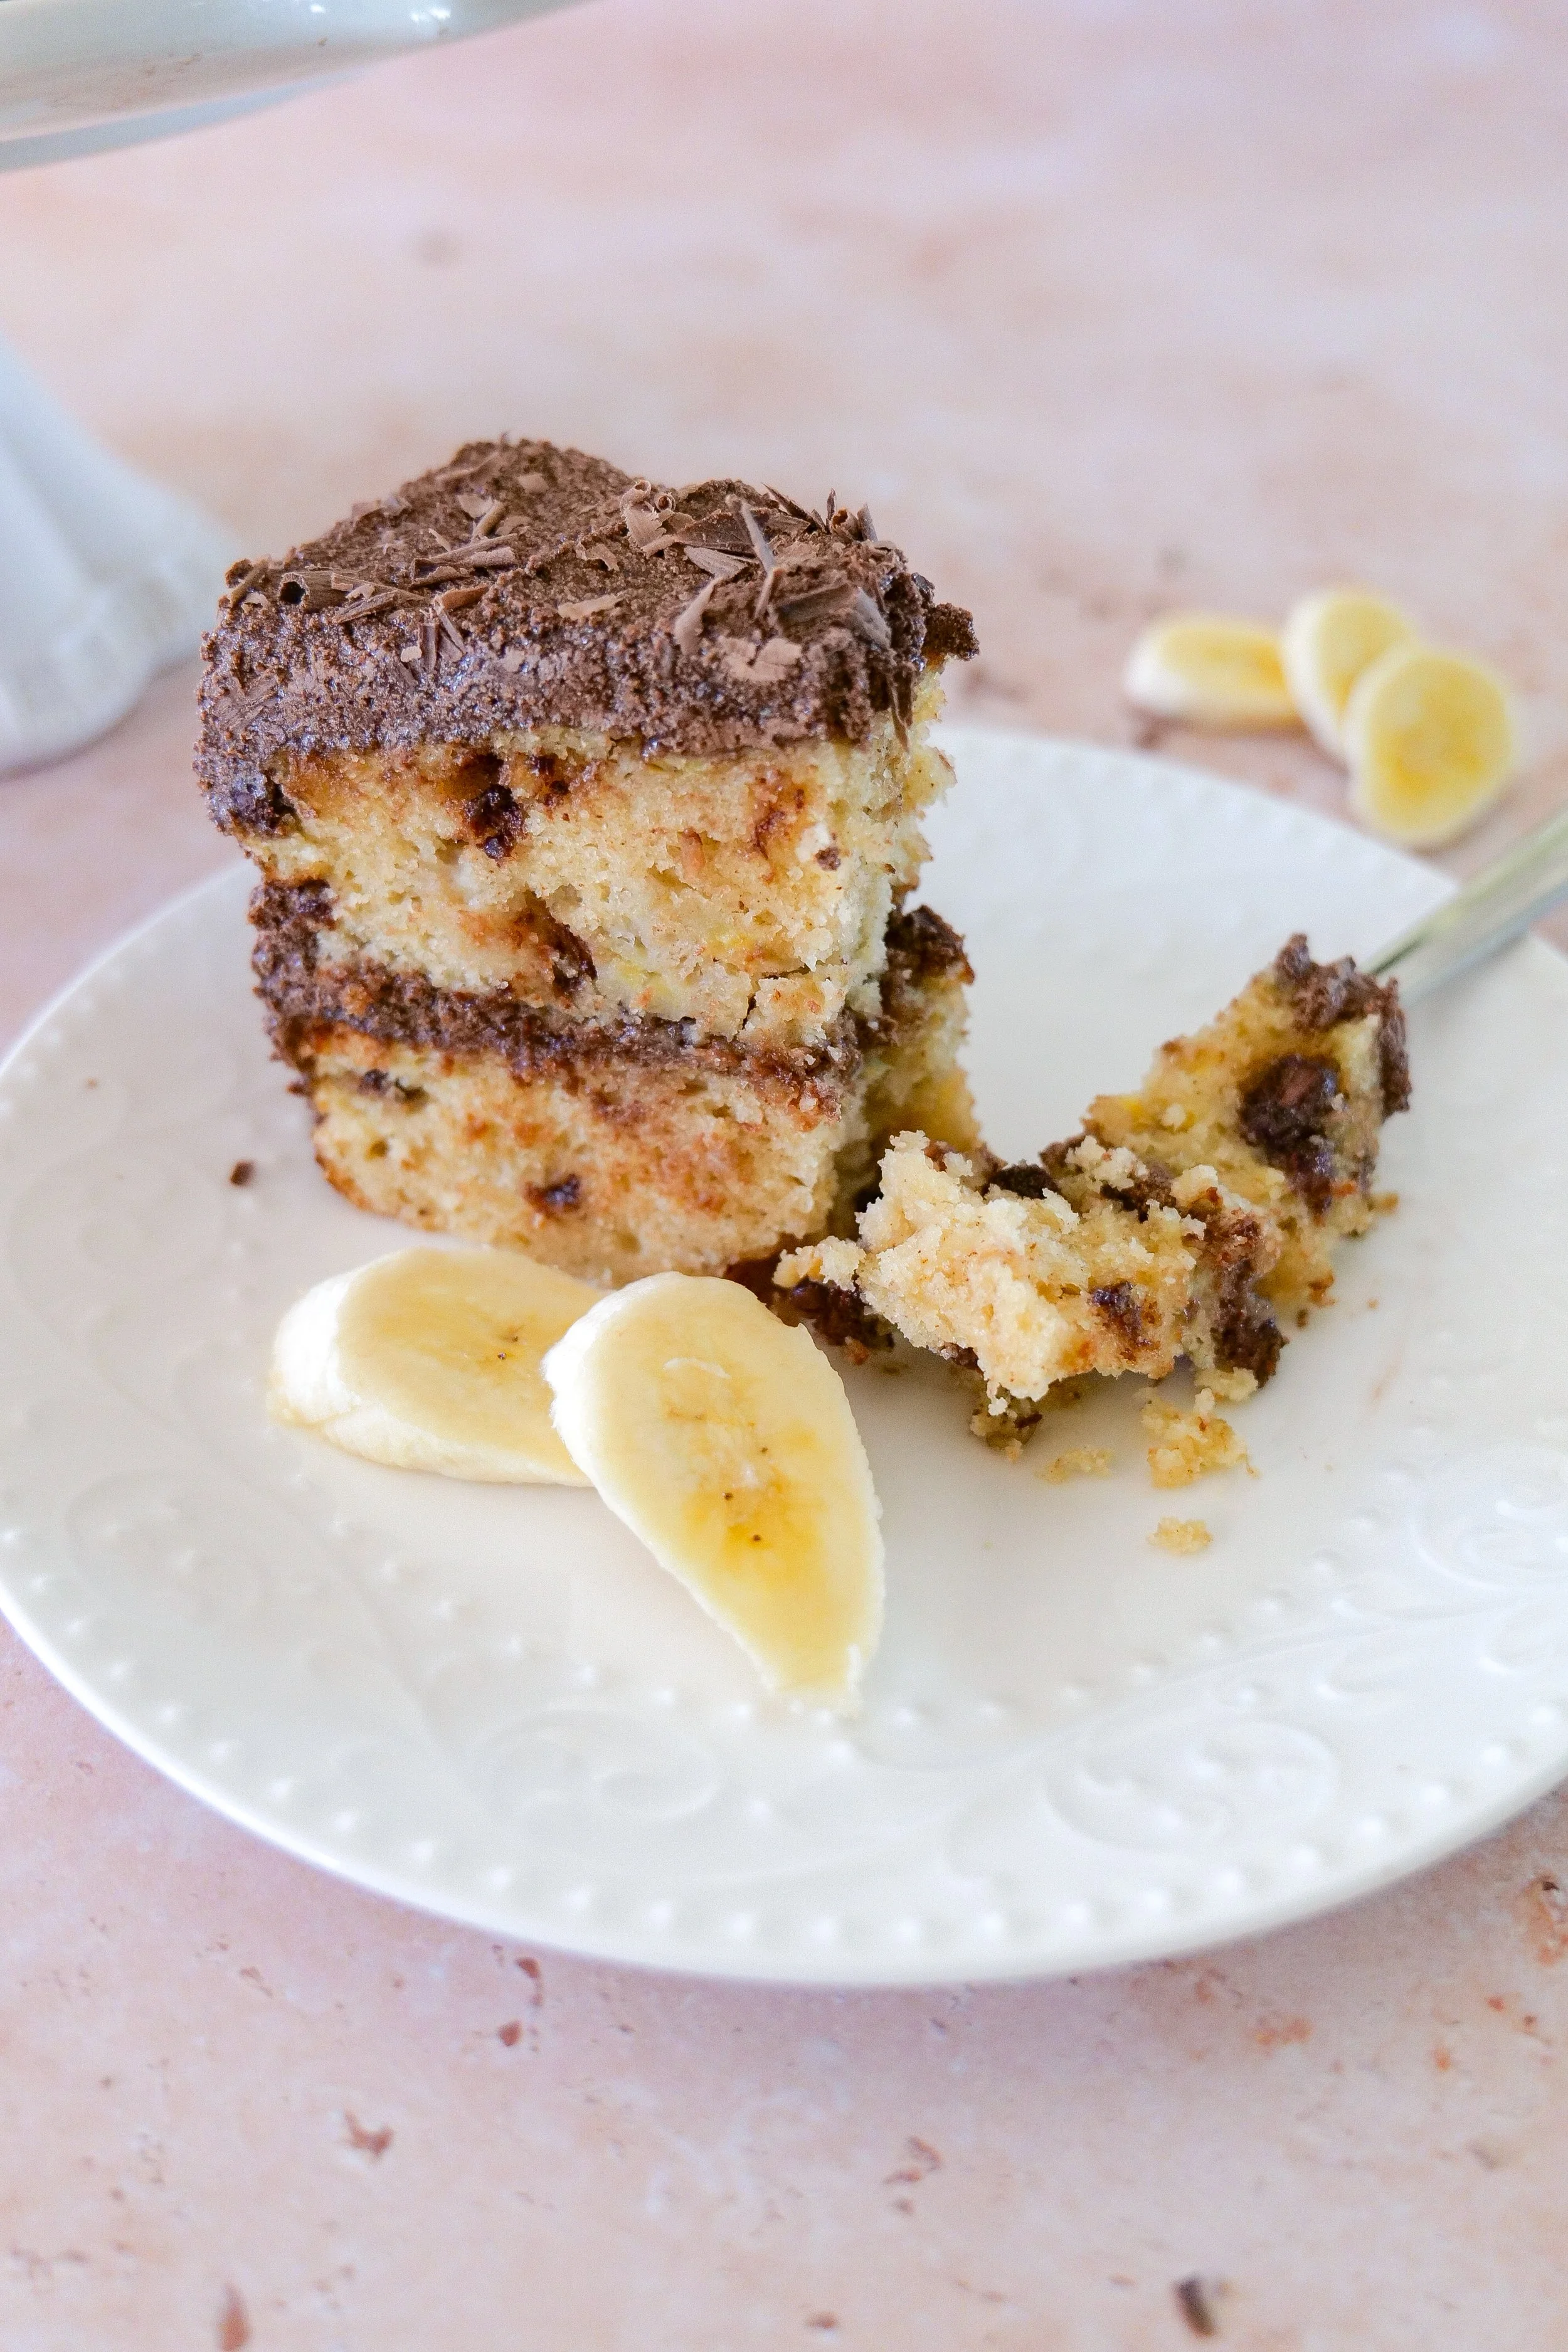
The Ultimate Comfort Dessert: Banana Chocolate Chip Cake & Ganache Frosting!

In the dessert world, few things are better than the sweetness of a well-baked Banana Chocolate Chip Cake with Chocolate Ganache Frosting. This yummy cake combines the natural sweetness of ripe bananas with the rich, creaminess of whipped chocolate ganache, creating a delicious blend of flavors and textures. Whether you're indulging on a cozy evening or hosting a family gathering, this cake promises comfort and joy. In this post, I'll explore every step of making this luscious treat, from creating the perfect banana cake base to topping it with the ultimate chocolate ganache frosting.

The journey to a perfect Banana Chocolate Chip Cake begins with gathering the right ingredients. The essential components include ripe bananas, chocolate chips (if desired), flour, sugar, eggs, and a few other basic baking staples. These form the foundation of a batter that balances the moist, sweet banana flavor with delightful bursts of chocolate.

Why it is Better to Use Overripe Bananas?

One of the secrets to the mouthwatering flavor and perfect texture of Banana Chocolate Chip Cake is the use of overripe bananas. These bananas, characterized by their brown and spotty peels, are nature's gift to bakers, offering attributes that transform a simple cake into a divine dessert. Overripe bananas naturally enhance the cake's sweetness and moisture. Their soft consistency makes them easy to mash and easily blend into the batter, ensuring an even texture throughout. Additionally, overripe bananas have a more concentrated banana taste, enriching the overall flavor profile of the cake. Using these bananas not only reduces on food waste (which I hate) but also makes for a better overall cake. As the cake bakes, the natural sugars in the bananas caramelize, adding a layer of complexity that makes each bite better than the last.

Baking Hack: How to Quickly Ripen Bananas

In cases where your craving is strong, but your bananas aren't quite ready, knowing quick ripening methods can help to save the day. Achieving the perfect texture and flavor requires ripe bananas, and there are several ways to quicken this process if time is of the essence. The oven method is straightforward; simply preheat your oven to 300°F (150°C), and place the bananas on a baking sheet. Let them warm for about 15–20 minutes until the peels darken. Alternatively, a microwave can be used to quicken the ripening process, by pricking the bananas a few times and microwaving for 30 seconds to one minute depending on your microwave's strength. For a more natural approach, consider placing bananas in a paper bag with an apple overnight, leveraging ethylene gas to speed up ripening. These hacks work just fine to bring out the robust banana flavor for your cake.

Substitutions and Swaps

The beauty of baking is the ability to customize recipes to suit personal tastes or dietary needs. The Banana Chocolate Chip Cake is no exception and offers many opportunities for adaptability through ingredient substitutions. Consider swapping traditional chocolate chips with dark or white chocolate to add a new dimension of flavor. If you seek a different moisture level or sweetness, try substituting bananas with applesauce. For those needing gluten-free options, alternative flours such as almond or coconut flour work well. Even the ganache can be adjusted for dietary preferences, replacing the cream with coconut milk for a dairy-free version that’s equally rich and creamy. These swaps allow you to tailor the cake while maintaining its essential characteristics.

What Ingredients Do I Need to Make Banana Chocolate Chip Cake with Chocolate Ganache Frosting?

Creating the Banana Chocolate Chip Cake with its delicious ganache frosting requires a collection of carefully chosen ingredients. Each element plays an important role in building the cake's flavor and texture profile, resulting in a simple and satisfying dessert.

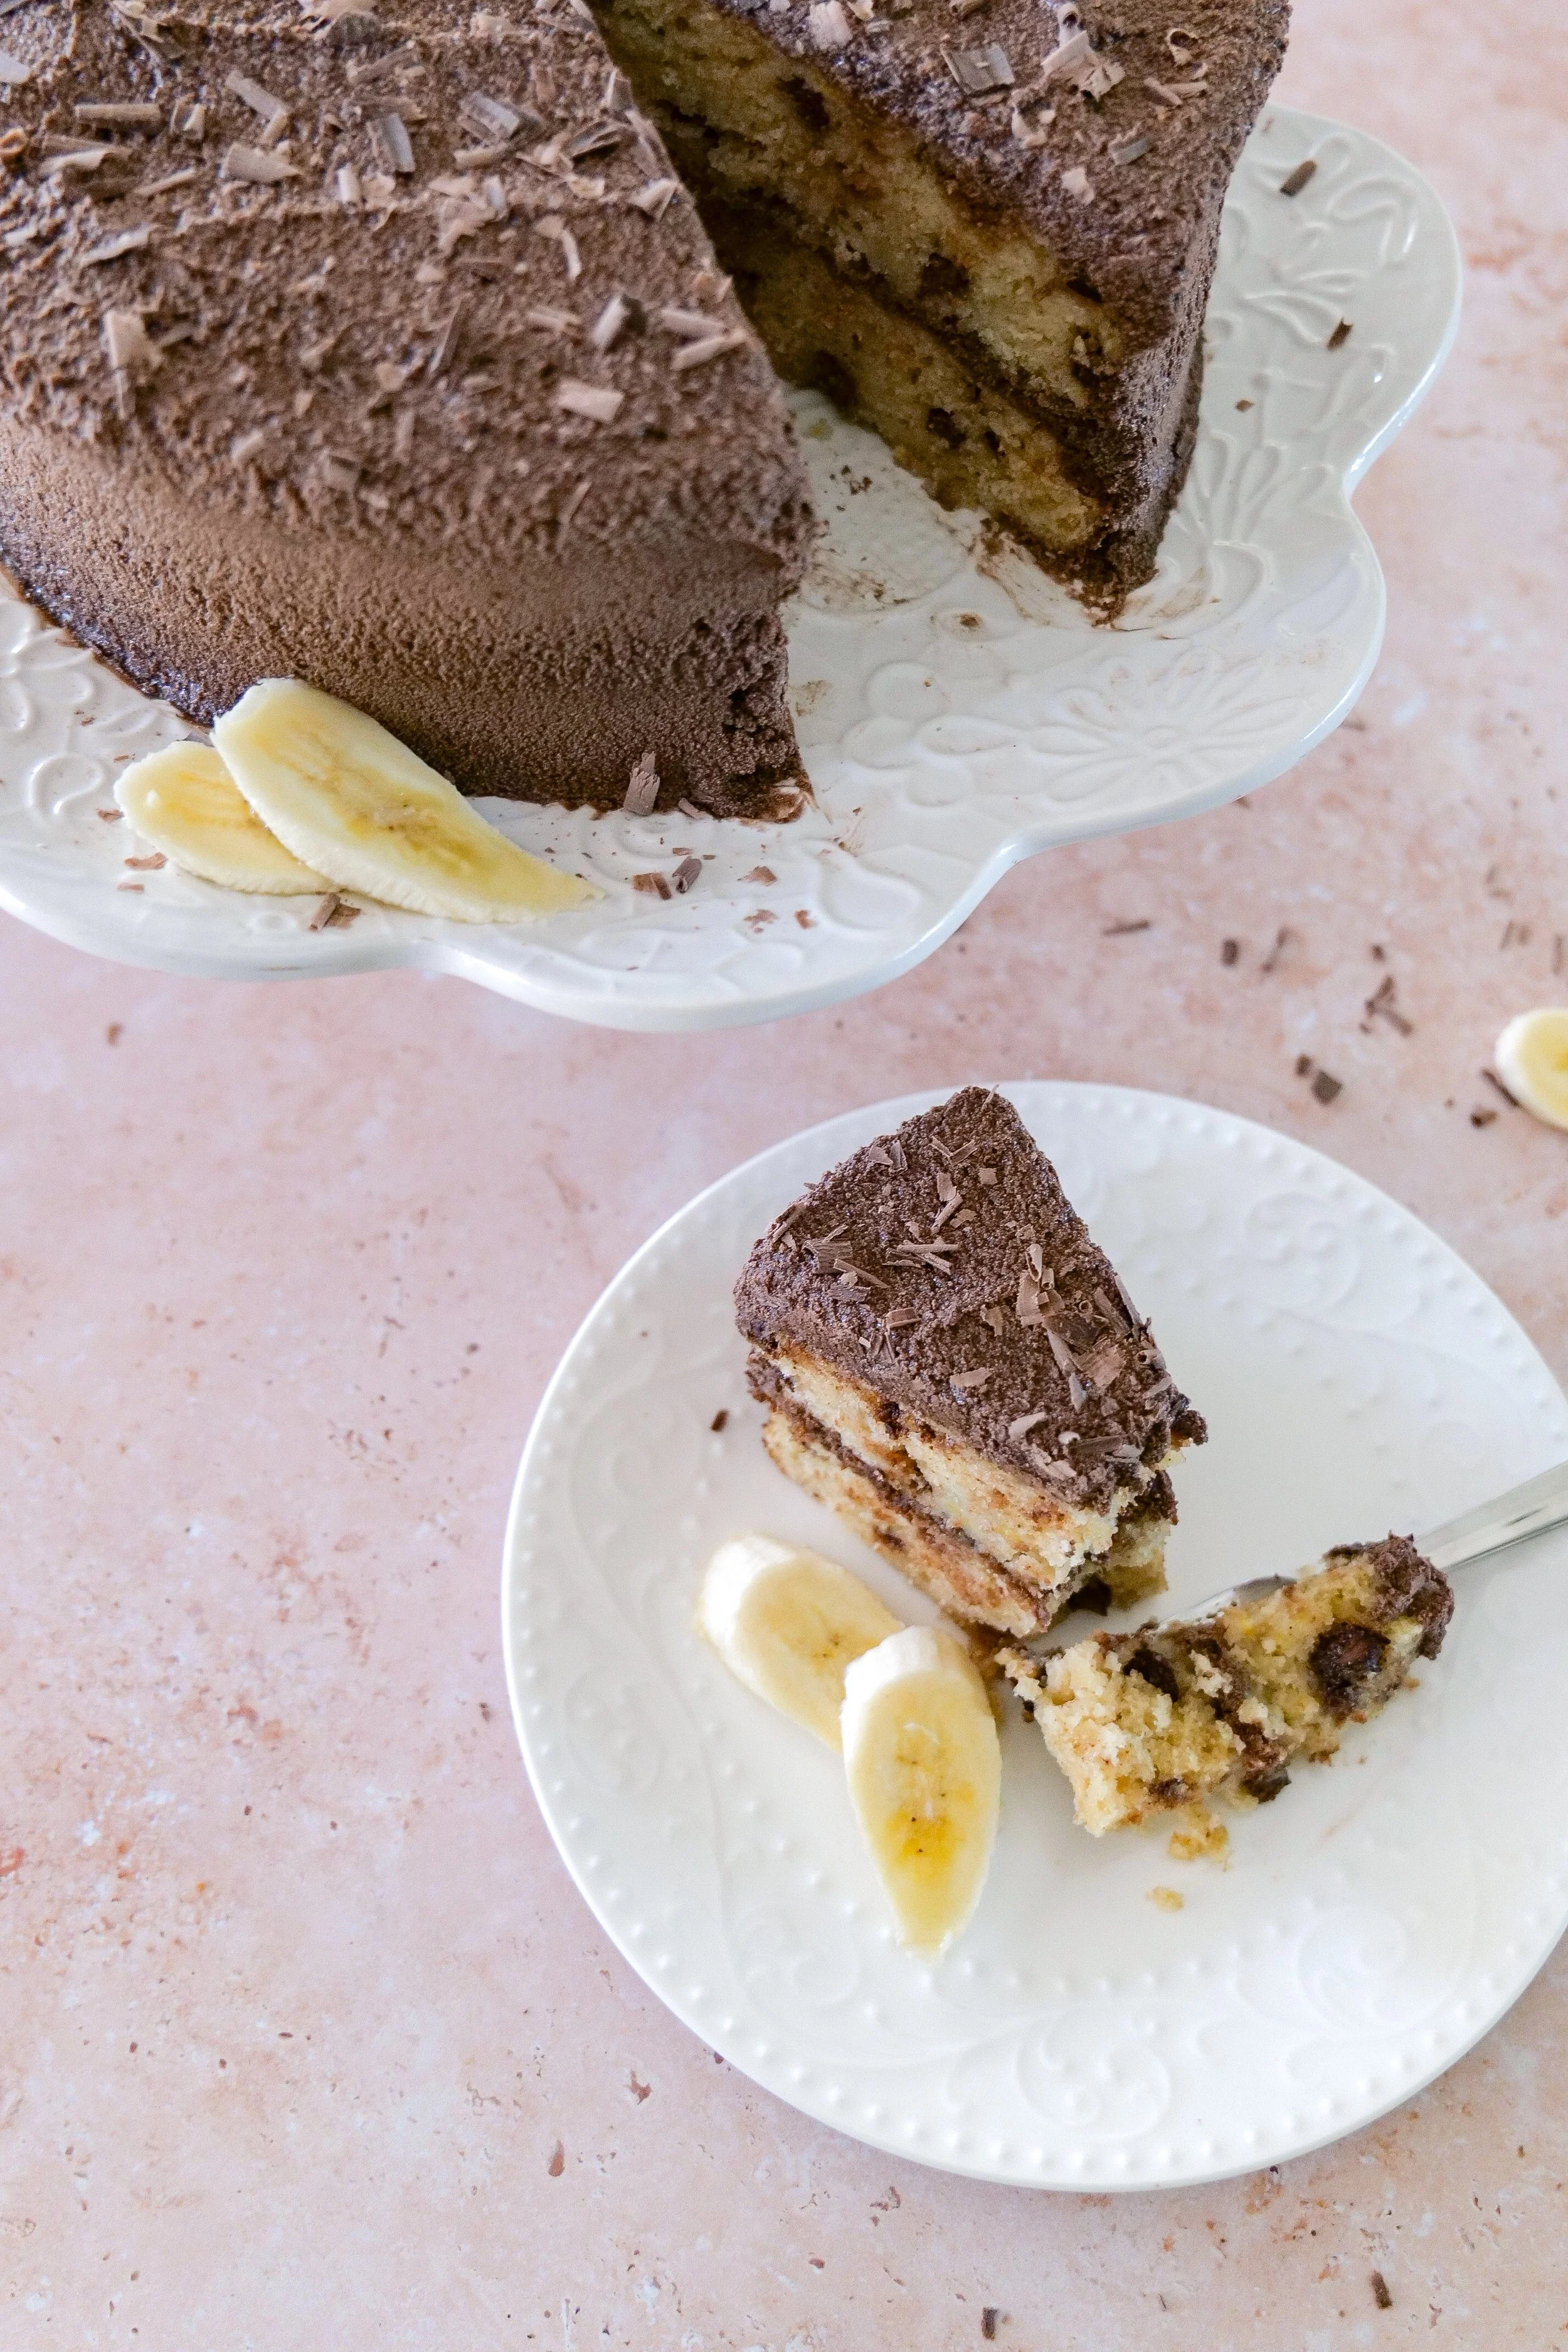
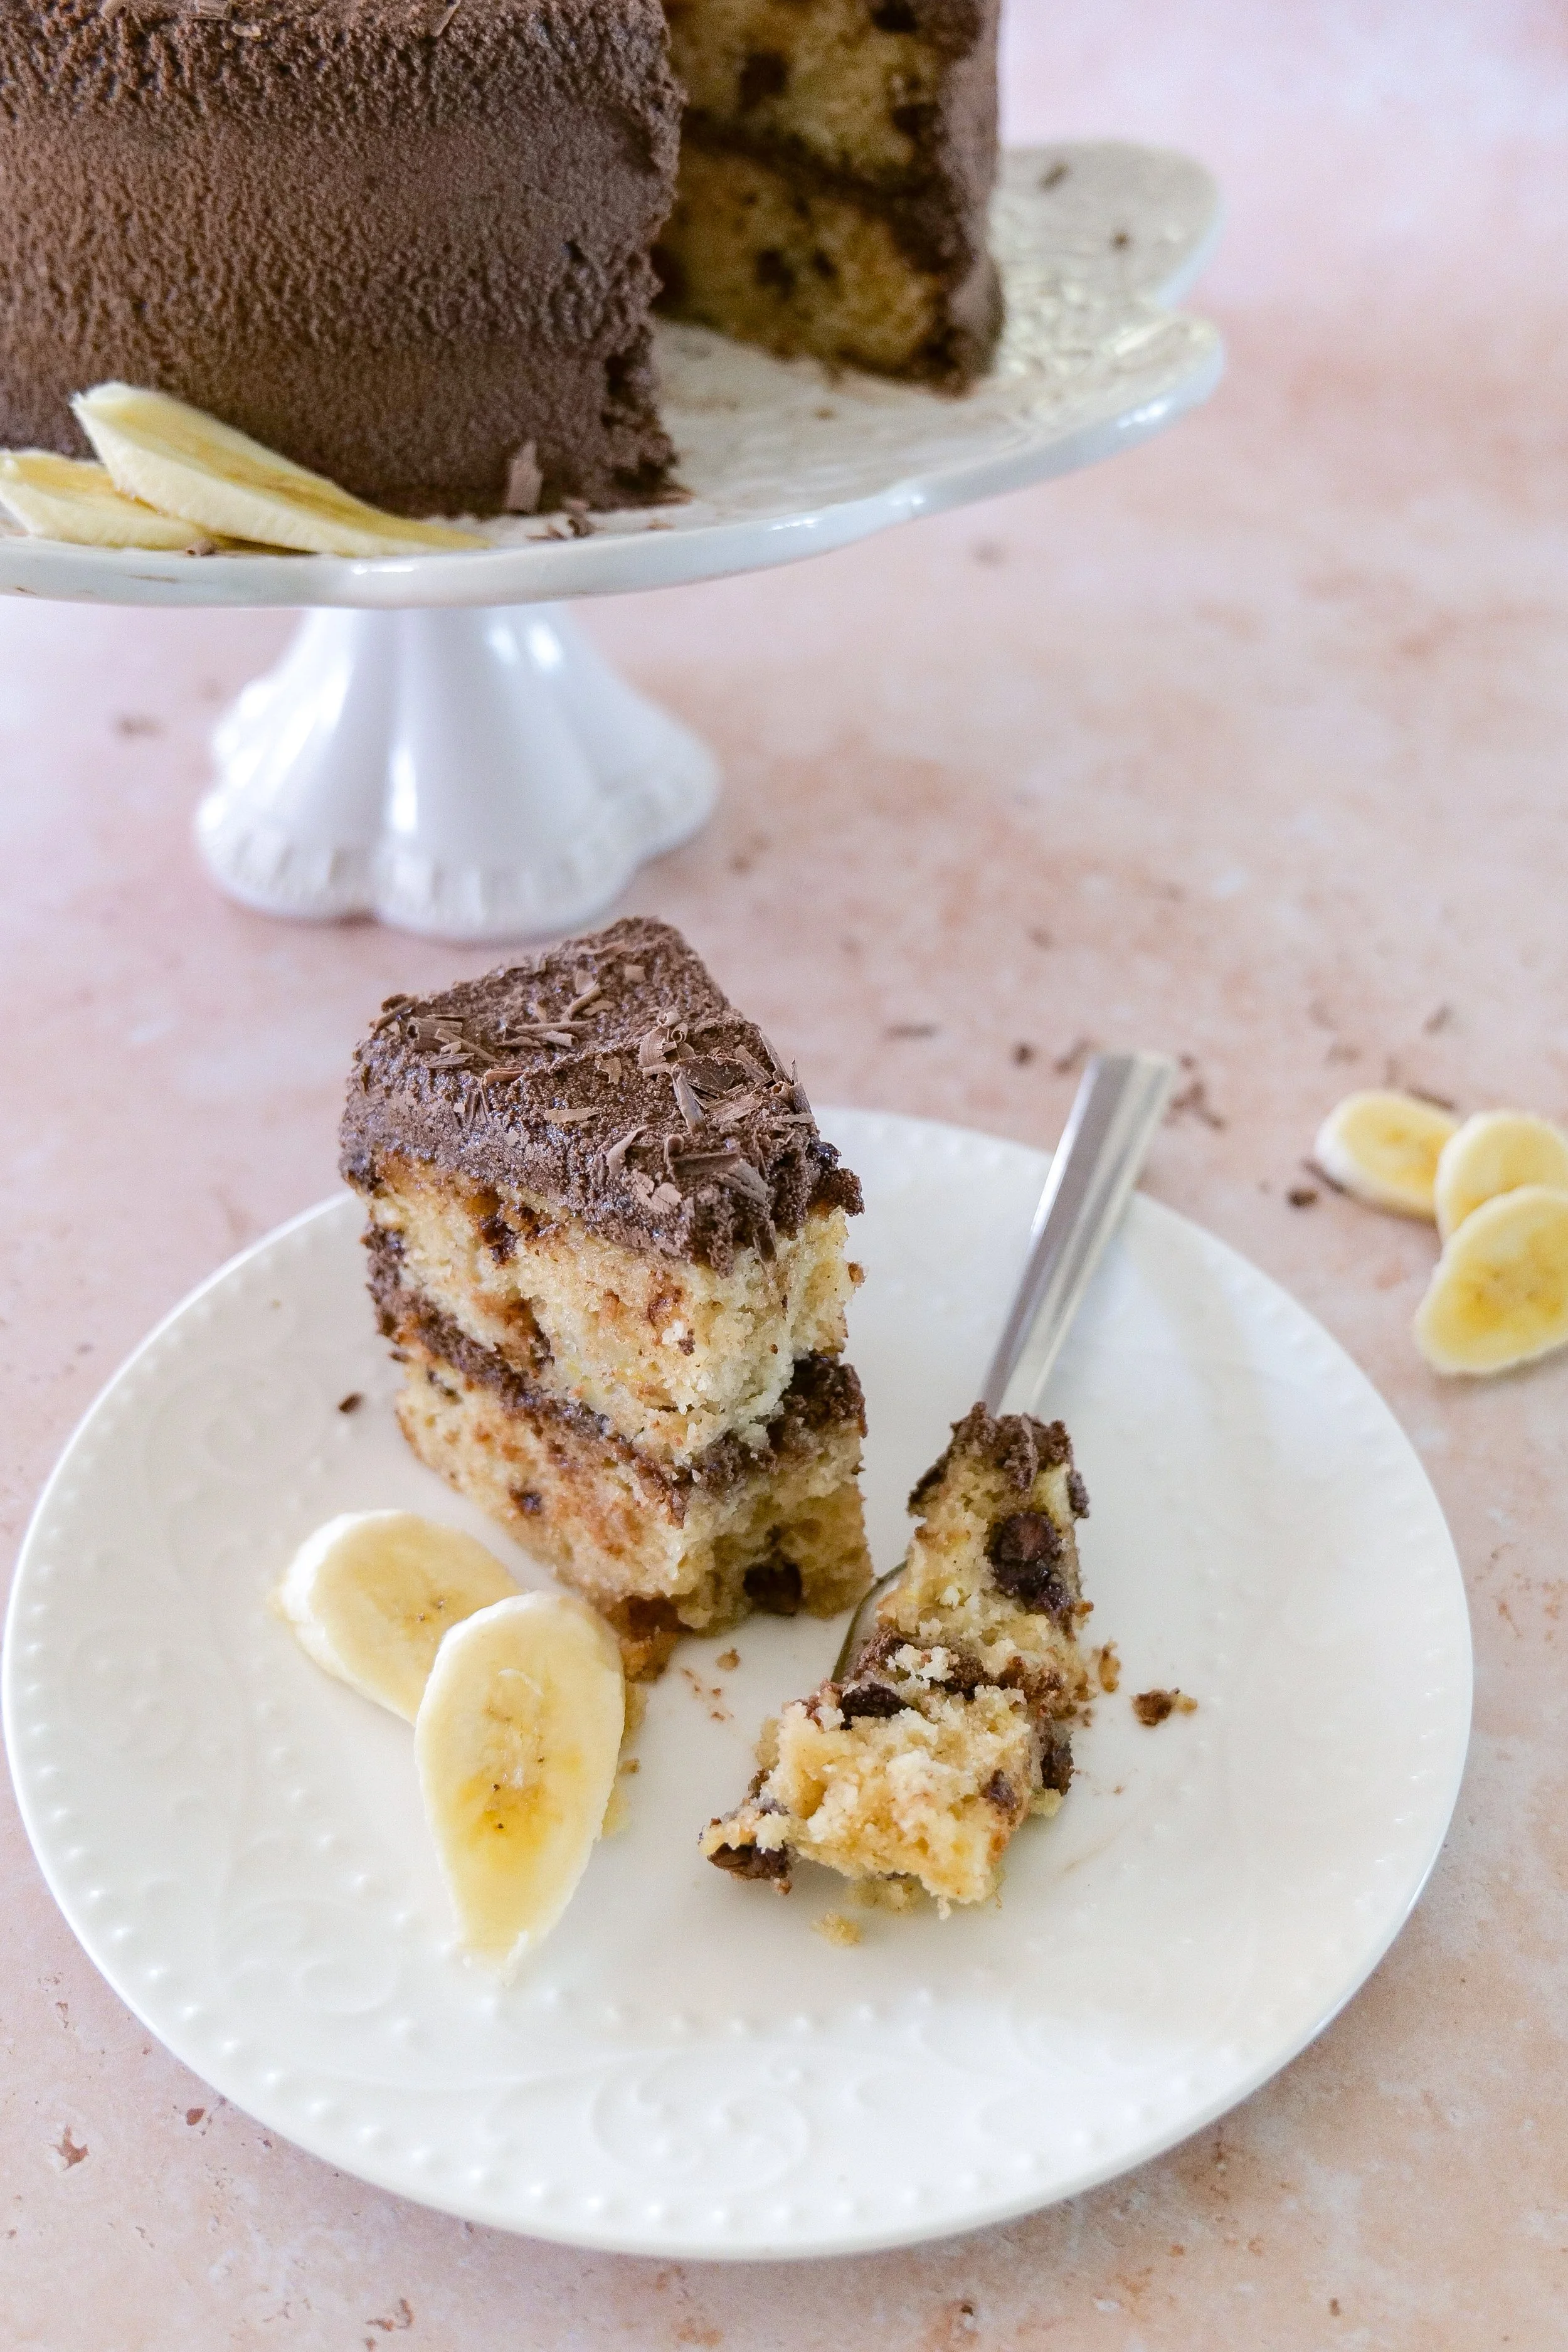
At the heart of this dessert is the Banana Cake with Whipped Chocolate Ganache Frosting. Soft layers of banana cake intertwined with chocolate chips deliver bites that are both comforting and exciting. The final touch is the whipped chocolate ganache frosting, a luxurious topping that transforms the simple cake into a masterpiece. The balance of banana and chocolate in each element creates a blend that is both familiar yet refreshingly new, making it a dessert worth mastering.

How Do I Make the Chocolate Ganache Frosting for the Cake?

Creating the perfect chocolate ganache frosting involves a few simple steps to achieve that creamy topping that really elevates the Banana Chocolate Chip Cake. Here’s how you can make it at home: Start by gathering your ingredients, namely heavy cream, semi-sweet chocolate chips, and a dash of vanilla extract for added depth. Heat the heavy cream until it's steaming but not boiling, as this ensures a smooth blend without scorching the chocolate. Pour the hot cream over your chocolate chips, allowing them to stand for a few minutes to soften. Stir gently until the mixture is entirely smooth and the chocolate has melted, then incorporate the vanilla extract. Allow the ganache to cool slightly, which thickens it to the ideal consistency for spreading over the cake.

What is the Best Way to Store the Banana Chocolate Chip Cake to Keep it Fresh?

Storing your delightful Banana Chocolate Chip Cake correctly ensures it remains as fresh and delicious as when first baked. Proper storage techniques maintain its moist texture and keep the ganache frosting silky smooth. For short-term storage, keep the cake in an airtight container at room temperature if consuming it within 2–3 days. This prevents the cake from drying out while allowing the flavors to blend beautifully. To store it longer, place it in the refrigerator, ensuring it's well-covered to prevent the ganache from hardening or absorbing other odors. If you plan on freezing the cake, wrap slices individually in plastic wrap and store them in a freezer-safe container. Before enjoying, let frozen slices thaw overnight in the refrigerator for the best texture.

Can I Use Frozen Bananas for This Cake Recipe?

Using frozen bananas offers a convenient alternative for those who have ripe bananas stocked in the freezer. This method not only saves you from last-minute grocery runs but also helps minimize waste by using overripe bananas effectively. Ensure that frozen bananas are fully thawed before incorporating them into your cake batter. This helps achieve the correct texture without adding excess moisture. If any extra liquid is present, drain it to maintain batter consistency. The process of freezing and thawing can actually enhance the banana flavor, resulting in an even more banana-rich cake. So, not only does this method prevent waste, it also enhances the cake's overall taste.

The Chocolate Chip Banana Cake with Chocolate Ganache Frosting is an indulgent experience that brings warmth, comfort, and joy with every bite. So, whether you're looking for new baking hacks to perfect the ripeness of your bananas or experimenting with creative substitutions to suit your dietary preferences, this cake is truly versatile and delightful. By using this recipe and mindfully selecting ingredients, you can transform simple elements into an over-the-top centerpiece worthy of any table. So, why not treat yourself, your family, and friends to this ultimate comfort dessert and make baking it a cherished tradition!

Ingredients

4 large eggs

1 cup heavy cream

2 tbsp. melted butter

3 tsp. vanilla

1 - 1/2 cup sugar

2-1/4 cups cake flour

1 tbsp. baking powder

3/4 tsp sea salt

1 cup brown butter

4-5 over ripe bananas

1 1/2 cups chocolate chips

Whipped Chocolate Ganache:

16 oz chocolate melts

2 cups heavy whipping cream

Instructions

1. Prep by oiling 2 circle pans (8 or 9 inch) and preheat oven to 350 degrees.

2. In a large bowl mash bananas. In the same bowl add together eggs, heavy cream, melted brown butter, and vanilla and blend completely.

3. Add dry ingredients in a different bowl until combined. Add in wet ingredients and blend together with hand mixer until well blended together. Add in 1 cup of chocolate chips.

4. Once combined pour into 2 pans that are oiled, sprinkle the 1/2 cup left of chocolate chips on top and put into oven. 22-27 min, if you want a 4 layer cake do 4 pans t 10-12 min only or until toothpick inserted comes out clean.

5. Make ganache while cake is baking. Heat heavy cream in a pan until nearly boiling. Pour hot cream over chocolate in a bowl. Let stand for 2-3 minutes and stir until completely melted together. Set aside to cool completely for 2 hours. After cooled whip until light and fluffy with a hand or stand mixer. This will be enough to fill and ice the cake. If you are only doing one of these things you can cut recipe in half.

8. Once cake is done baking let cool in pan for 15 min and transfer to cooling rack for another 15-30 min until cooled and ganache is ready.

9. Ice layers of cake with ganache frosting. You can do a simple layer between the two cake layers and on top or go heavy around all the sides. Serve and Enjoy!

Other Delicious Cake Recipes:

Indulge in the Irresistible Delight of Espresso Chocolate Cake with Heavenly Raspberry Cream Cheese Frosting!

Banana Cake with Decadent Brown Butter Cream Cheese Frosting Will Wow Your Taste Buds

Delight in Every Slice: Delicious Blueberry Cake with Mascarpone Frosting

Taste the Deliciousness of Pistachio Cake: A Treat for Any Occasion

Zesty Indulgence: Crafting the Perfect Layered Orange Cake with Raspberry Mascarpone Frosting

My Favorite White Cake Recipe

Savor the Sweetness: A Guide to Making Carrot Sheet Cake with Brown Butter Frosting

Indulge in Deliciousness: Cherry Chip Cake with Chunks of Dark Chocolate Recipe

Indulge Your Sweet Tooth with This Delicious Brown Butter Spice Cake with Honey & Fig Jam Frosting

Indulge in the Irresistible Delight of Gingerbread Cake with a Decadently Rich Brown Butter Caramel Frosting!

Banana Cake with Decadent Brown Butter Cream Cheese Frosting Will Wow Your Taste Buds

This Banana Cake with Brown Butter Cream Cheese Frosting dessert perfectly combines moist, flavorful cake with a frosting so delicious that it takes the taste to a whole new level. This treat takes the traditional banana cake and enhances it with the flavor of brown butter cream cheese, leaving an unforgettable impression on your taste buds. So, whether you're an experienced baker or not in the kitchen, this cake offers a delightful challenge with an amazing payoff that is so worth the time.

What everyone loves with brown butter cream cheese frosting lies in its rich and nutty flavor, a great blend between the toasted complexity of brown butter and the creamy tang of cream cheese. When butter browns, the milk solids within it caramelize, giving a unique depth and dimension to the frosting that you can't achieve with regular butter. This layering of tastes turns a simple cream cheese frosting into a masterpiece that’s both decadent and surprising, and just waiting to savor every bite. To create this frosting at home, start by gently cooking unsalted butter until it turns golden brown, then mix it with smooth cream cheese to achieve a perfect blend of flavors.

This perfect pairing of the sweet crumb of a banana cake and this delicious frosting elevates both components, allowing the tastes of them to shine on their own without overpowering one another. The nuttiness of the frosting complements the sweetness of bananas, while the cream cheese adds a light, tangy contrast. As the cake melts in your mouth, each component creates an unforgettable mix of flavors. This perfect combination ensures that the cake is not only rich in taste but also offers a little something new to wow your guests.

Achieving just the right velvety frosting is an art, perfected by the help of cream cheese that lends to the perfect texture. The creamy base of full-fat cream cheese ensures that each bite of frosting is not only flavorful but also incredibly smooth. When combined with brown butter, the constant texture of cream cheese elevates the cake's lusciousness, offering a great taste and texture that is both rich and airy at the same time. While this brown butter cream cheese frosting is the perfect topping for banana cake, its use doesn't stop there. The sophisticated flair it adds to desserts makes it an excellent option for pairing with a range of baked goods. From spiced carrot cakes to pumpkin muffins or even sandwiched between oatmeal cookies, this frosting can adapt to various flavors, bringing a gourmet touch to many different occasions.

The popularity of banana cakes comes from their ability to remain tender and moist, an aspect that this recipe embraces fully. Using ripe bananas in the batter not only infuses the cake with natural sweetness but also ensures that melt-in-your-mouth texture. This flavor combination is only made better by the addition of brown butter cream cheese frosting, allowing these rich tones to mix together nicely. This recipe really provides satisfaction with every bite.

Ingredient Notes

Selecting the right ingredients is essential to the success of the banana cake and its frosting. Overripe bananas are very important, because when bananas are speckled with brown, their sugar content peaks, offering the best sweetness and moisture. Full-fat cream cheese is key for a creamy consistency, while vanilla extract is the flavor enhancer that ties it all together. Powdered sugar gives the perfect level of sweetness within the frosting, creating a smooth consistency without graininess.

How to Tell the Brown Butter is Ready to Use

Observe the Color

The hallmark of perfectly browned butter is its golden-brown color. This can only be achieved by patiently cooking the butter until the milk solids undergo caramelization. Smell and listen for these changes as you slowly bring the butter to temperature. A nutty, rich aroma starts to take over the kitchen, and that may be the best part of the whole baking experience. Also, the sizzling sound of the butter will switch to a quieter hiss as the water evaporates and the butter begins to brown.

Check for Foam

As the butter transforms, it will foam to help indicates that browning is underway. As the moisture content decreases, the foam will start to subside, pointing to near-completion. Timing this process is crucial as it typically takes about 5 to 8 minutes on medium heat. Keeping a close eye at this point ensures that your butter doesn’t burn, guarding the deeply nutty flavor needed for an exceptional frosting.

Make-Ahead and Storage Instructions

If you really need to save on time without sacrificing flavor, browning the butter well in advance can be a game-changer. It not only enhances the frosting with that delicious richness but also simplifies the preparation when you're ready to bake. The cooled butter can be stored in an airtight container in the refrigerator until it’s needed. Returning it to room temperature before you mix it into the frosting ensures the proper flavor depth.

Preparing your banana cake ahead of time is also achievable to save time as well. You can bake the cake up to two days before serving and store it tightly wrapped at room temperature. Making the frosting separately and refrigerating it for up to three days is simple, providing flexibility. For extended storage, freezing the unfrosted cake ensures it maintains its texture and flavor. Remember to bring the cake to room temperature before serving, allowing the flavors to fully come out.

More Ways to Decorate a Banana Cake

Enhancing the visual appeal and flavor of your banana cake doesn’t stop with frosting. By experimenting with different toppings and decorations, you can add personality and flair to your dessert. Consider adding textural contrasts with toasted nuts or a sprinkle of chia seeds. Drizzle a chocolate or caramel sauce over the top or even top the cake with fresh fruit for bursts of color and natural sweetness. For a touch of elegance, edible flowers can elevate the presentation, and a dusting of cinnamon or nutmeg can intensify the cake's warming aromas. You can also make it in multiple round cake pans instead of a sheet pan and frost into a full layered cake.

Tips for the Best Banana Cake

Creating the best banana cake means paying close attention to ingredient selection and technique. Overripe bananas ensure an unmatched moistness and sweetness. Both baking soda and baking powder are crucial to achieving the desired rise and fluffiness. Mix the batter lightly to prevent it from becoming dense and allow it to cool completely before frosting to maintain the cake’s ideal texture. For those who crave extra flavor, consider adding toasted nuts or spices directly to the batter.

Can I use frozen bananas for the banana cake?

Using frozen bananas is a perfectly viable option for this banana cake, especially when you have a stash of overripe bananas stored away. Upon thawing, these bananas become even more sweet and moist, delivering an extra richness to your cake. Mash them thoroughly to ensure smooth mixing into the batter. While the resulting texture may be slightly denser, the flavor is often enhanced, making the most of your banana reserves.

Can I use a different type of icing for the banana cake?

Tailoring your cake's icing allows for personalization according to dietary needs and taste preferences. While the brown butter cream cheese frosting is so delicious, other options can also work with your banana cake. Consider classic cream cheese or buttercream frostings, or even a simple glaze for different textures and flavors. Vegan or non-dairy alternatives like whipped coconut cream can accommodate dietary restrictions. For creative exploration, flavored icings such as chocolate or peanut butter can also offer appealing complements.

How should I store the banana cake to keep it fresh?

Storing your banana cake correctly is key to preserving its delicious flavors and moisture. Enclose it in an airtight container to block out air, which could dry the cake out. If you'll finish it within two to three days, keeping it at room temperature works. For longer preservation, refrigeration is advisable, or you can freeze the cake for up to three months when more extended storage is necessary. Proper covering prevents any absorption of surrounding flavors or fragrances, ensuring a delectable cake ready to go whenever you need it.

Ingredients

1 cup brown butter

1 cup granulated sugar

1½ cup whole milk

3 eggs

2 tsp vanilla extract

½ tsp salt

2 tsp baking powder

3 cups all-purpose flour

4 smashed very ripe bananas

CREAM CHEESE ICING

1/4 cup salted butter, browned

1 4 oz light cream cheese, softened

1/2 tsp vanilla

1 cup powdered sugar

Instructions

1. Preheat oven to 350 degrees. Grease a 9x13 pan. Set aside.

2, Next Smash the bananas. Set aside.

3. Using a hand mixer combine butter and sugar. Add in eggs one at a time and mix just until incorporated.

4. Add vanilla extract, salt, and milk until combined. Add in baking soda and flour. Scrape sides and mix well.

5, Then, add mashed bananas into mix. Pour the cake batter evenly into the greased 9×13 pan.

6. Bake at 350 degree for 50-60 minutes or until toothpick comes out clean.

7. While cake bakes melt butter in pan until browned and has a nutty smell. Pour into a clean bowl and put in fridge until cake is done baking and you are ready to make cream cheese frosting.

8. Let cake cook while mixing the cream cheese icing. In the brown butter bowl add the softened cream cheese. Beat for 2 minutes until smooth. Add vanilla and mix until blended. Lastly, add powdered sugar and beat until smooth.

9. Frost cake with cream cheese icing and add toppings if desired before serving! I love to add a few fresh slices of banana and walnuts to mine!

Other Delicious Cake Recipes:

Indulge in the Irresistible Delight of Espresso Chocolate Cake with Heavenly Raspberry Cream Cheese Frosting!

Delight in Every Slice: Delicious Blueberry Cake with Mascarpone Frosting

Taste the Deliciousness of Pistachio Cake: A Treat for Any Occasion

Zesty Indulgence: Crafting the Perfect Layered Orange Cake with Raspberry Mascarpone Frosting

Savor the Sweetness: A Guide to Making Carrot Sheet Cake with Brown Butter Frosting

My Favorite White Cake Recipe

Indulge in Deliciousness: Cherry Chip Cake with Chunks of Dark Chocolate Recipe

Indulge Your Sweet Tooth with This Delicious Brown Butter Spice Cake with Honey & Fig Jam Frosting

Deliciously Sweet: Pumpkin Coffee Cake with Pecan Crumbles

Discover the Bliss of Homemade Acai Bowls

Packed with vitamins and heart-healthy fats, a homemade acai bowl recipe is a fuel-forward approach to kickstart your day with zest and vitality. In this culinary exploration, we'll uncover the essence of the acai berry, tell you what constitutes an acai bowl, what gives it its nutritive profile, and how you can craft this tropical delight in the comfort of your kitchen.

What is Acai?

Dive into the heart of the Amazon Rainforest with a curious little drupe known as the acai berry—a powerhouse of nutrition and taste. Recognized for its deep purple hue and antioxidant properties, this berry forms the crown jewel of acai bowls, the health food sensation. Whether in frozen form, powder, or juice, acai boasts a distinctive flavor that's both tart and subtly earthy, making it an ideal candidate for a wide array of gastronomic creations, particularly the sought-after acai bowl recipe.

An Acai Bowl is a canvas of texture and flavors, beginning with a base of acai berry puree, served in a bowl, and garnished with a myriad of fresh fruits, grains, and syrups. A medley of health benefits tags along with the acai bowl, stemming from its generous dose of antioxidants, fiber, and fats essential for heart health. The sheer versatility of the dish allows for limitless creativity—perfect for tailoring to your nutritional desires.

Are Acai Bowls Healthy?

Acai bowls have become synonymous with early morning healthy food culture, accredited to the nutrient-rich acai base. They commonly encompass a spectrum of fruits, nuts, and grains, boosting the nutrient quotient significantly. However, the secret to maintaining the healthiness of an acai bowl lies in vigilance over sugar content and portion control. When crafting your bowl, aim for a balance of ingredients and be mindful of the serving size to prevent an inadvertent calorie surge.

Steps to an Irresistible Acai Bowl

Freeze your fruit

Beforehand, take these actions to ensure your fruits are freezer-ready. Select fresh fruit that's ripe for peak flavor. After washing and prepping the fruit, segment it into bites for uniform freezing and blending ease. Lay the chunks on a baking tray lined with parchment paper, avoiding overlap. Add to the freezer until solid ensures they’re ready for their supporting role in your acai bowl.

Step 2: Prep your Toppings

Consider these varieties to your acai bowl toppings to embellish your bowl. Fresh fruits like blackberries, cranberries and banana slices yield a nutritive and flavor-packed layer. Add a boost of well-being with seeds or a sprinkle of granola for that desired crunch. A drizzle of honey, peanut butter or coconut flakes all adds natural sweetness to your bowl along with additional health benefits. Keep your favorite toppings sorted and at hand for speedy assembly. The beauty in it is the acai bowl is completely customizable.

Step 3: Blend Acai

When it comes to the blend, ensure your harmony of acai and other sweet fruits gives an even, silky consistency by opting for thawed acai fruit that merges willingly with frozen bananas, fruits and liquid choices. The final texture should resemble a dense, creamy ice-cream that stands up to the weight of toppings.

Step 4: Top Acai Bowl

Add depth to your acai bowl with a selection of your favorite toppings. The assortment of toppings, ranging from fruits to grains, should promise a delightful crunch and a splash of color. An optional drizzle of honey can introduce a whisper of sweetness and decadence.

How to make Acai Bowls in Advance

Stay ahead of the curve by preparing bowls beforehand. Blend the base mixture and freeze in individual portions. Prep and portion your toppings, storing them to retain their crispness. Thaw the base slightly prior to serving, then artfully arrange with toppings for a swift gourmet experience.

Choosing the Best Acai Puree or Powder

Navigate your acai selections with the following tips:

- Look for Purity: Aim for acai purees or powders devoid of additional sugars and artificial additives, as these dilute authenticity and health perks.

- Certification Matters: Organic acai products ensure a crop free from unwholesome chemicals.

- Quality Dehydration: Favor freeze-dried over spray-dried acai products to keep nutrients intact.

- Potency Counts: Check product density for a potent acai flavor and maximal nutrition.

- Evaluate Reviews: Consider consumer feedback and the reputation of brands to find the prime ingredient for your bowl.

Ingredients

2 Servings

4 Frozen Acai Packets (unsweetened or sweetened)

1 Frozen Banana

1/2 cup Frozen berries or favortie fruits

1/2 cup liquid (can be coconut milk, water or favorite of choice)

Favorite Toppings:

Blueberries

Strawberries

Sliced Banana

Kiwi

Granola

Coconut Flakes

Honey


Instructions:

1. Blend together acai packets, frozen banana, frozen fruit & liquid until consistant with ice cream. Pour into bowl.

2. Top with your favorite toppings. All of mine I am using today are listed above but fill free to change and adapt to what is in season at your local grocery store and make it customizable to your liking.

3. Enjoy this healthy and delicious treat!

Other Fruit Recipes You Will Love:

Fruit & Goat Cheese Bruschetta

Welcome To Summer Charcuterie Board for Your Next Gathering

Indulge in the Sweet & Salty Deliciousness of Peach Baked Brie

How to Make the Perfect Pear and Pomegranate Arugula Salad

Savor the Fusion: Sweet & Spicy Mango Chicken Wings Recipe

Enjoy the Comfort of Homemade Delicious Banana Bread

Few aromas are as welcoming as the scent of banana bread baking in the oven. That unmistakably sweet, cozy fragrance that fills the home in the morning is only the beginning of the experience of a slice of Simply Delicious Banana Bread. Whether you're looking for a way to use up those browning bananas on your counter or you're after a foolproof treat that's sure to please, this banana bread recipe is the answer. Let's explore what makes this treat so special, from the rich banana flavor to the nutty crunch, to the customizable mix-ins, and how this simple pleasure has become a staple in kitchens around the world.

With its moist crumb and rich banana taste, this classic dessert has stolen the hearts of many. It stands as a testament to the phrase "less is more," proving that deliciousness can also be simple. The sweetness of these bananas eliminates the need for excess sugar, while their soft texture contributes to the bread's irresistible moistness. The key ingredients in this easy-to-make treat are items you likely already have in your kitchen, like flour, sugar, and eggs. Combining these basics with ripe bananas results in a sweet delight that is as fun to make as it is to eat.

This is a great starter recipe for those new to baking and a quick, satisfying project for seasoned bakers. Add in your favorite nuts, chocolate chips, or a pinch of cinnamon or nutmeg to put your own twist on the classic recipe. Whether you're craving a quick breakfast, a midday snack, or a dessert, Simply Delicious Banana Bread fits the bill.

The Ideal Loaf Pan for Perfect Banana Bread

Choosing the right loaf pan is key to banana bread bliss. Here are some tips and essentials I am sure to use every time. A stainless steel loaf pan is your golden ticket to easily removing that golden loaf and achieving an even bake every time. Steer clear of dark or glass pans. These can unevenly distribute heat, potentially leading to an overcooked exterior and undercooked middle. Make sure to mind the depth. A pan that's too deep might leave you with an underbaked center amid dry edges. My favorite loaf pans to use for this recipe and all my bread recipes are the 360 Cookware loaf pans. They have three to choose from and my personal code AmandaWarren20 will give you 20% off your order. Shop Here No matter your choice in bakeware, the key is to ensure that your Simply Delicious Banana Bread turns out perfectly each time.

How to Ripen Bananas for Banana Bread

The ideal banana for this bread is ripe with plenty of brown spots. Think of those brown spots as nature's sweetener. But what if your bananas aren't quite there yet? There are tricks to accelerate ripening. If you're in a hurry to bake and your bananas are still too firm, you don't have to wait for days for them to ripen. A few ways I speed up the process are to place bananas in a warm area to help the ripening or store them with an already ripe banana or an apple in a paper bag to promote ripeness through natural gas release. For another express route to ripeness, pop unpeeled bananas into the oven. Ripening bananas properly ensures Simply Delicious Banana Bread will live up to its name with the perfect sweetness and texture.

Storing and Freezing Your Banana Bread

Once your banana bread has cooled and you've had your fill, storing it properly is important to maintain its taste and texture. Be sure to let it cool completely and use plastic wrap or foil to protect the bread's freshness. For enjoying within a few days, an airtight container will suffice. For longer storage, freeze slices or the entire loaf and thaw as needed.

Looking to freeze for later use? This is always a favorite of mine, so I have bread when unexpected company comes over or I want something tasty for breakfast. Be sure to wrap tightly to keep the air out and prevent freezer burn. You can keep your treat fresh in the freezer for up to 3 months. So be sure to mark the date on the outside. Once you are ready to enjoy again remove from freezer and let sit out to defrost overnight or microwave for that just-baked taste. Proper storage ensures that every slice of Simply Delicious Banana Bread remains as good as the first.

Classic simply delicious banana bread embodies the comfort of home-baked goods. Its wonderfully moist texture and naturally sweet flavor gained from ripe bananas make it an everlasting favorite. This breakfast loaf is as practical as it is satisfying, because you are reducing food waste while also whipping up a tasty delight! It truly is a win-win situation! The simple ingredients make for a hassle-free baking experience and offer a warm, inviting finish to any meal. Banana bread is really suitable for any occasion like breakfast, snack time, or dessert. My favorite part of baking banana bread is how much you can customize with confidence by adding nuts, or chocolate chips to make it uniquely yours. So, the next time you spot those speckled bananas on your counter, know that they are the start of something truly special.

Ingredients:

3 overripe mashed bananas

1/2 cup melted butter

3/4 cup brown sugar

2 eggs

2 cups all-purpose flour

3 teaspoons baking powder

1/4 teaspoon salt

Directions:

  1. Preheat oven to 350 degrees, oil favorite loaf pan and set aside.

  2. In a large bowl mash overripe bananas. Add in eggs, brown sugar, and melted butter. Mix well.

  3. Stir in flour, baking powder and salt. If adding in nuts or chocolate chips you can add now.

  4. Pour batter into prepared loaf pan and top with chopped nuts if desired.

  5. Bake for 60 minutes on middle rack until a skewer inserted comes out clean.

  6. Let come to room temperature and turn over on a wire rack to remove loaf from pan.

  7. Enjoy!